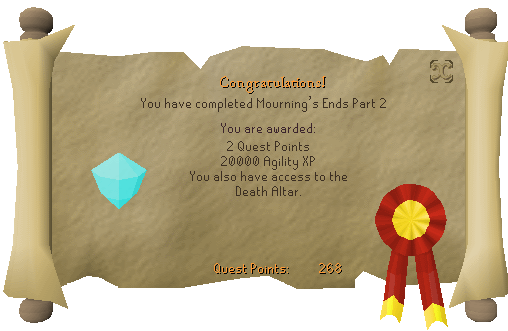
Reward
- 2 Quest Points.
- 20,000 Agility XP.
- Access to the Death Altar and a Death Talisman. |
 Start Point Start PointLletya, Speak to Arianwyn. Members Only |
Difficulty:

Length:
|
Requirements
Skill: High Agility is an advantage.
Quest: Must have completed Mourning's Ends Part I.
Item: Chisel, Mourner's Clothing from Part 1, Rope, 50 General Items Rope, Spade, Iron Pickaxe, Iron Axe, Knife, Plank, Pie Dish, Full Sack of Potatoes, Pot Of Flour, Bucket Of Milk, Ball Of Wool, Oak Logs, Chisel, Shears, Needles, Thread, Cooked Meat, Iron Nails, Unicorn Horn Dust, Bronze Bar, White Berries, Hammer, Potato Cactus, Skull, Babydragon Bone, Face Mask, Rune Essence, Lobster, Tinderbox, Lockpick, Bronze Med Helm, White Apron, Jug Of Wine, Kebab, Leather Boots, Swamp Paste, Redberries, Cheese, Vial Of Water, Flax, Gold Ring, Egg, Leather Gloves, Cake Tin, Necklace Mould, Rotten Tomato; A Book: Crumbling Tomb, Battered Book or Prifddinas A History; A Ticket: Agility Arena Ticket or Archery Ticket; A Key: Dusty Key, Jail Key or Door Key. or a Death Talisman.
Recommendations
Skill: 43 Prayer, 60 Agility.
Item: Ardougne Teleport Runes, 50 Prayer Potions or more, Teleportation Crystal(4), Gear to help preserve Prayer Points, Agility Potion x2, Lots of Food - preferably Sharks, means to Teleport to various locations around the RuneScape World.
This chapter of the quest takes our hero deep under the mountains of Arandar to put a stop to the evil plans of the mourners.
If our hero is to succeed, they must solve one of the most complicated puzzles in all of Gielinor.
Part 1:
A Blackened Crystal
Step 1
Speak to Arianwyn.
Receive the key to the Excavation site.
Report your findings to Arianwyn.
Receive the Blackened crystal.
Go back to the Excavation area.
Items needed: Mourner Gear, Food.
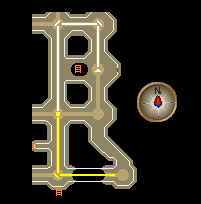
Speak to Arianwyn in Lletya and you will tell him about the 'Temple of Light' that the Mourners are looking for (Picture). You will agree to make sure that they don't find it. Arianwyn tells you to make sure that the mourners haven't gotten the keys to the excavation site yet.
Go to West Ardougne, into the Mourner Hut and down the trap door to the Mourner's Headquarters. Remember you will need your mourner clothing for this. Ask the Head Mourner if he has the key to the excavation site. Hey will say that he has lots and he will want to investigate the disappearance of one of the digging crews. He will give you a key.
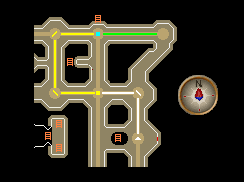
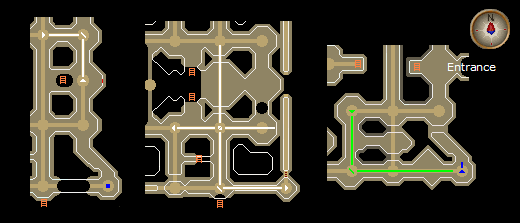
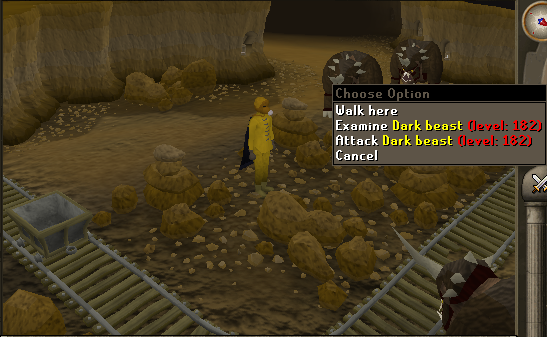
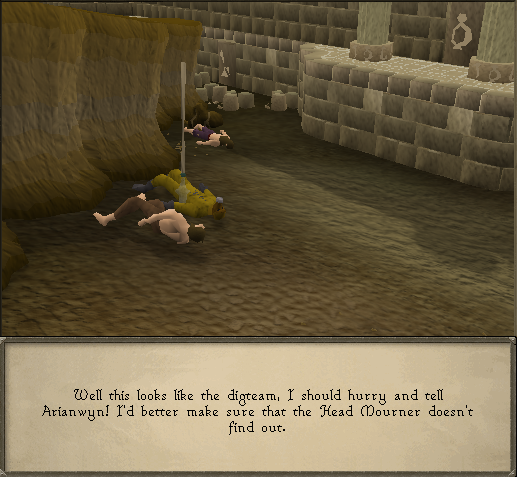
Go west in to the excavation site and follow the tracks west. You will see a number of Dark Beasts (Level-182) (Picture). Run past them and take the southern tunnel. Follow it all the way down staying to the south until you see a number of dead slaves and mourners (Picture). You will also see many Shadows (Level-73) which must have killed the dig team. You will tell yourself that you should go tell Arianwyn about this, while keeping it a secret from the Head Mourner.
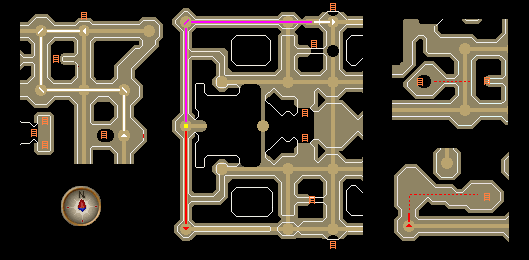
Before you go see Arianwyn, go back to the temple of light and up the staircase in the first room you come to. When navigating the temple beware of all the Shadows (Level-73) and the spinning blades which may pop out of the walls. Keep Protect from Melee prayer on at all times while inside the Temple, because the Shadows can hit quite hard. Go south until you see a staircase on the western wall. Go up the stairs and then head north once more, go down the set of stairs you see there and then up the other side. From here go east and then south where you will see the blackened crystal (Picture). Below is a map to help you out. Use your chisel on it to get a sample and then take it back to Arianwyn.
Use your teleport crystal to get back to Lletya and talk to Arianwyn. When you tell him about the dig crew, Arianwyn will tell you about the history of the temple and the safe guards that must have failed. He will ask you go retrieve a part of a blackened crystal from the temple. Since you have already collected the Blackened crystal, talk to him again and he will tell you how the crystal is broken and he will summon Eluned to make you a new copy. Once you have your new crystal, you will be told to take it to the altar at the end of the light maze. Head back to the maze.
Note: From this point on, remember to keep your Mourner gear on, as well as have the Key in your inventory, along with your Teleport crystal. After this step teleport to Ardougne and get about 10 prayer potions, some food, a rope and Ardougne teleport runes. Again, make sure you still have your new key and mourner gear. Keep about 4-5 spaces open for quest items.
Part 2:
The Temple of Light: RuneScape's hardest challenge
Step 2
Search the Guard near the Entrance for a Colour wheel and a Journal.
Pull the Lever on the Second floor, and collect the items.
Direct the mirror to the coloured door, changing the colour using Crystals.
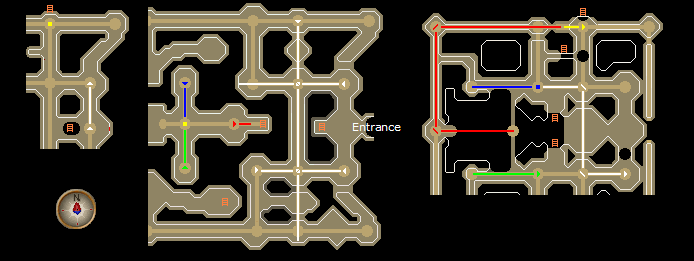
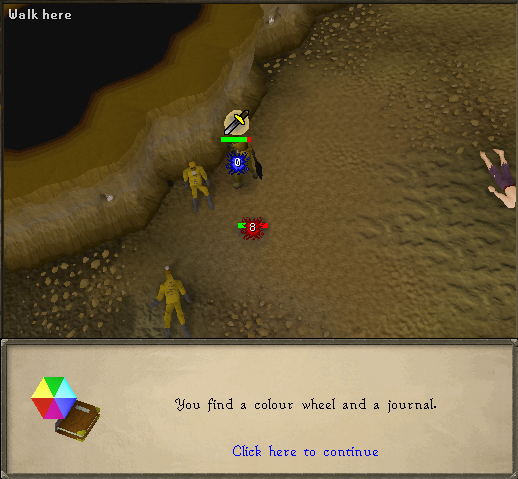
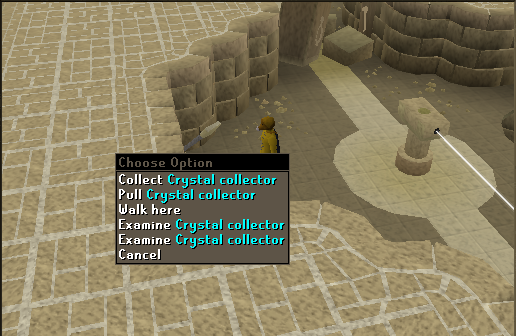
Outside the temple of light, search the guard lying on the northern wall for a colour wheel and a journal (Picture) (Picture). The journal talks about the life of the mourner. Head into the temple and go up the stairs to the second floor. Just to the east of the stairs is a 'collector' (Picture). Pull on the lever and then collect the supplies inside of it, making sure you have enough room for them. You should get 3 mirrors and a yellow crystal, and the 4th mirror is already in the pillar closest to you. Remember to keep Protect from Melee on at all times, and watch your Hitpoints and Prayer points often.
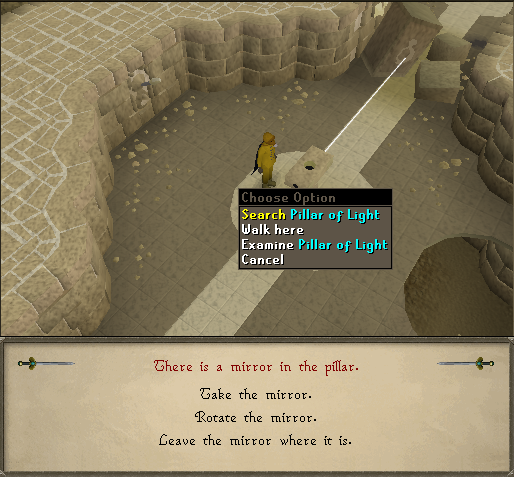
The goal for you at this time is to direct light beams using the mirrors and use the crystals to change their colours. The doors of light can only be opened by the colour opposite of it on your 'colour wheel'. First you will need to get to the blue door. To do this use mirrors on the pillars, search the pillar (Picture) and rotate the mirror (Picture) to direct the light where you want it to go. You can also place crystals in the pillars to change colours. The combination for directing the light using the pillars is: North, West, South, Yellow Crystal, and East. Below is what you configuration should look like.
Once the light is aimed at the door cross the hole using the 'wall supports' and pass through the door. If you keep failing the wall supports, keep trying and you will eventually get through. Get the two mirrors and cyan crystal from the chest.
Note: Even at Level 60 Agility, crossing the 'wall supports' can be very hard and long. To make it easier, wear boots of lightness, spotted cape or spottier cape, drink an agility potion, drop your mourner clothes (very heavy) near the lever on the second floor and run toward the wall supports, get mirrors and crystal from the chest and run back to the lever, get back your clothes. That will take you less than 30 seconds, another player won't be able to catch your clothes.
Step 3
Collect items from the collector.
Direct the light according to the first combination.
Pull the Lever to restart.
Complete the combination according to the second Map.
Now go back and pull the lever on the second floor, then collect the items from the collector. This time the combination for the light is: North, West, Yellow Crystal, North, East, and Cyan. Below is what you configuration should look like. This should get you to a purple door, behind which the chest contains two more mirrors. At this point, if you happen to be short on supplies, Teleport to Ardougne and restock. If you are in good shape, carry on.
 The next door is more complicated. Pull the lever to restart again. From the start the combination for the pillars is: North, West, Nothing, North, East, and Up. Then go up the ladder beside you and point the next pillar west which will turn the beam purple if you adjust your camera to see it.
Now go back down the ladder and navigate your way to the center of the top floor. From here go to the west side of the temple while watching out for the blades on the walls. Direct the light south from the North West corner, and then place the yellow crystal on the next pillar which will turn the purple beam red. Then direct the beam down at the south west corner.
From here you will need to go back and down to the middle floor. Only a few seconds away from where you entered the blue door, you will see a room with a giant hole in the middle. Use your rope on the rock near it and climb down. Below is what you configuration should look like. Go west to the newly opened cyan door and search the chest for your blue crystal.
Step 4
Complete the next Combination according to Map.
Get new mirrors and a Fractured crystal.
Complete the next Combination.
The next combination from the light start point is: North, West, Cyan, North, East and then Up. Go up the ladder just beside you and direct the cyan beam west. Then, as you did in step 10, work your way to the north west corner of the top floor and direct the blue beam, down.
Go to the bottom floor and into the room with the yellow door, in the north west corner. Rotate the mirror so that the light open up the other door. Below is what you configuration should look like. Go through it and get the new mirrors and a fractured crystal out of the chest. Go replenish your supplies in Ardougne once more.
 You will now need to get into the room with the blue door, the same way you did before in step 8. Once you are in there, add the blue crystal to the pillar and then go back out. DO NOT use the reset/collection lever at this point or you will loose the blue gem you just inserted. Get back all of your mirrors and gems except for the blue crystal by manually grabbing them.
The next combination from the light source is: North, West, Up. Make you way to the top floor on the northern side and rotate the mirror to direct the light south. Go back to the southern side of the top floor and add your recently acquired 'fractured crystal' to the next pillar. This should split the beam in three directions.
Step 5
Direct the beam according to the Map.
Receive another Fractured Crystal.
Pull the Collection lever and get items back.
Split the beam in all directions by using the Fractured crystal.
Now that you have split the beam, take the beam heading west and direct downwards at the next pillar. Then follow the other split beam heading south and direct it east at the next pillar and then finally down. Go down to the south east corner of the bottom floor and through the purple door. Use your last mirror to direct the blue beam north and go through the door. Below is what you configuration should look like. Search the chest to get 3 more mirrors and another 'fractured crystal'.
 You are now on the last stage. Pull the collection lever to get everything back. You should have 13 mirrors and 6 crystals total. From the light source, direct the light north and then down. Go to the bottom floor and place the mirror so the light goes west.
Insert the fractured crystal that you just retrieved from the last step in the next pillar. This should split the light in every direction.
Step 6
Redirect the Northern beam.
Redirect the Southern Beam.
Open the White door.
The Northern Beam: On the next pillar it reaches, direct it upwards. Go to the second floor and add the yellow crystal the next pillar. Go up the ladder right next to you and use a mirror to bounce the beam west. Navigate yourself to the North West corner of the top floor again and use mirrors to direct the light south, then east which will automatically direct the red beam down to the first floor. To speed things up, do this along with the next two paragraphs.
The Southern Beam: At the next pillar this beam reaches, put in your other fractured crystal which will again split the beam. Follow the east beam and direct it upwards, then follow the western beam and direct it upwards as well.
Go to the top floor and use a mirror on the pillar just to the north of the staircase. The green beam should be bounced west. Then run as far to the east as possible and use a mirror to direct that white beam west and then north. Go to the northern side of the top floor and direct the light west and then add your blue crystal. Here is what you configuration should look like:
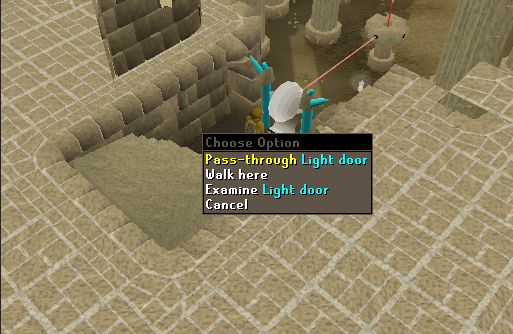
Now go down the stairs in the center of the top floor and then west down the second set of stairs. The cyan door of light should now be open because of the red light shining at it (Picture). Once you go through, rotate the mirror inside that pillar so that the red beam shines west. If you move farther west, you will see that that green, blue and red lights combine to make a white light that opens a white door for you (Picture).
Part 3:
Repairing the Blackened Crystal
Step 7
Encounter Thorgel near the Mysterious Ruins.
Gather the items Thorgel asked for.
Receive the Death Talisman.
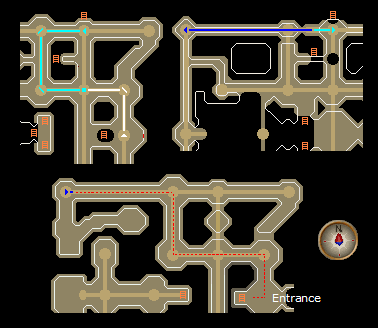
Enter through the light door, where you will see Thorgel who is friends with Klank from the Underground Pass quest (Picture). After exchanging stories of both of your entrances into the temple, he will tell you that he needs a number of items.
You may also notice some ruins beside Thorgel. These are the Death Ruins. He will give you a list of 50 items you must get for him. He will give you a death talisman in exchange for these items. If you already have a Death Talisman, you can skip to step 21.
Note: Before you leave, you MUST turn the last mirror to the east back so that it opens up the cyan door. If you do not do this you will need to complete the last part all over again. After you have switched the mirror, you may leave to get the items.
The items on the list are not expensive, not are they very hard to find. When ever you have one of the items in your inventory, it will be crossed off the list. If you give a bunch of items to Thorgel he will take those items off your list to make it easier for you. Here are some items that some people may have trouble finding:
- - Crumbling Tomb: Small building just north of Barrows.
- - Battered Book: Get from the bookshelf in your house after completion of Elemental Workshop I.
- - Prifddinas A History: Search the bookcases in Lletya
- - Door key: Search the plant pot in front of the witch's house in Taverley.
- - Jail Key: Dropped by the jailer in the Taverley Dungeon.
- - Skulls: North of the Mind Altar.
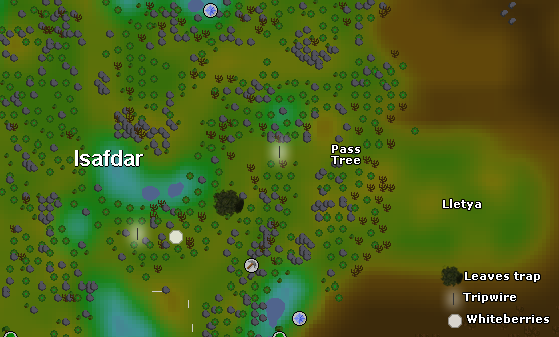
- - White berries: Red Dragon Lair in Wilderness or Isafdar (Map)
- - Potato Cactus: In Major Kalphite Rooms of their Lair.
- - Potatoes [10]: This is actually just a full sack of Potatoes.
Step 8
Give Thorgel the last items.
Enter the Death Altar.
Use the Newly Made Crystal on the Altar.
Use the Glowing Crystal on the Blackened Crystal.
Talk to Arianwyn and receive a Trinket to enter the Temple of Light.
 It may take you 2 to 3 trips to transport the items to Thorgel. Make sure your items are NOT noted, because he won't accept them. On the last trip bring your 'Newly Made Crystal' and your 'Teleportation Crystal'. You can also use the Shortcut in the Underground Pass to travel quicker, instead of going through the Temple of Light.
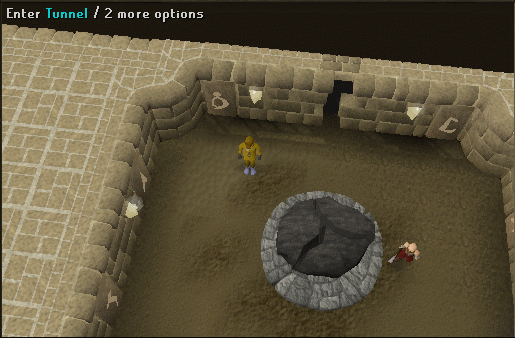
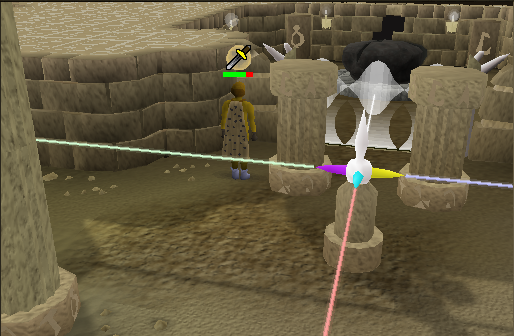
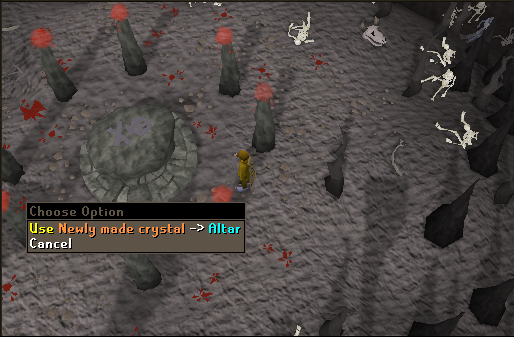
Take your final load of items to Thorgel and he will reward you with a death talisman. Use the talisman on the ruins beside you and you will be transported into the death altar which is full of non aggressive Ghosts (Level-19). In the altar use your newly made crystal with the altar in the center and it will begin to radiate a warm energy (Picture).
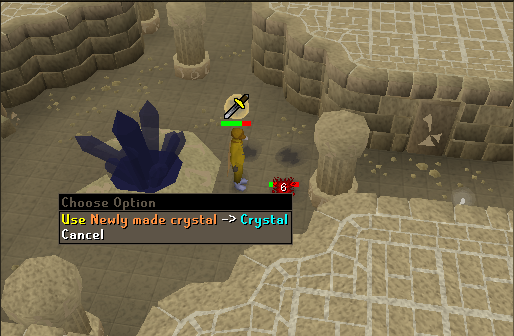
Now to repair that blackened crystal. Take your crystal with the energy flowing from it back to the top floor and use it on the blackened crystal (Picture). Suddenly it will revert back to its white state of being.
Use your Teleportation Crystal to go back to Arianwyn in Lletya. He will tell you that restoring that crystal should keep anyone from entering the temple for the next one thousand years.
When you mention that the dwarves managed to tunnel into the back of it, Arianwyn will say he is not worried. He will also give you a little trinket to allow you to gain access to the temple.
Frequently Asked Questions
Q: Is there an easier way to get to the Death Altar?
A: Yes, you can use the abyss to get there much faster.
Q: I lost my Death Talisman! Can I get it back?
A: If you ever need another you can either try killing Dark Beasts in the cave coming off the Mourner hideout's dungeon, buying it from another player or doing a whole new list for the dwarf. |


 OSRS RuneScape Help
 RuneScape Community Forums
 Skill Guides
 Quest Guides
 City Guides
 Guild Guides
 Mini Game Guides
 Treasure Trail Help
 Miscellaneous Guides
 Dungeon Maps
 Mining Maps
 Items Database
 Monsters Database
 Shops Database
 Tome/Books Database
 Skill Calculators
 Coordinate Locator
 Zchat Clan Chat
 Stuck on something? Want some more tips? Ask on our forums.

