Reward
- 3 Quest Points.
- 13,750 Agility XP.
- 15,000GP.
- Ability to wield a Dragon Halberd.
- Access to Tirannwn through Arandar. |
 Start Point Start PointUpon receipt of the King's message, King Lathas' palace, western East Ardougne. Members Only |
Difficulty:

Length:
|
Requirements
Skill: 56 Agility, 10 Crafting.
Quest: Underground Pass.
Item: 2 Ropes, Spade, 2 Planks, 5 Arrows (any), Any Bow, Any Pickaxe, 15-25 Coal, Pestle and Mortar, 4 Balls of Wool, limestone. (Obtained whilst completing the quest)
Other:Ability to defeat a Tyras Guard (Level-110).
Recommendations
Skill: 75 Combat and 43 Prayer.
Item: Plentiful supply of Lobsters, Armour (Rune or better), Weapon (Dragon or better) or Bow & Arrows, Gloves, Anti-Poison Potion, Falador and Ardougne Teleport Runes, Agility Potion (if under 56 Agility), Harpoon or Big Net (Fish at Elf Camp).
Continuing the plague city series, the Regicide quest takes you beyond the 'Well of Voyage' to a new realm. King Lathas will employ you once again, this time for the grim task of deposing his brother. Once you have traveled to the realm you will find yourself surrounded by new and strange plants, animals and even a new race. Once there, you will see that everything is not as serene as it first appears.
Part 1:
Underground Pass
Step 1
Speak to King Lathas.
Prepare yourself for the Underground Pass.
Enter Underground Pass
Cross the draw-bridge.
Grab a plank.
Swing across the void.
Follow the path.
Cross the metal grates.
Walk through passage (caution: wall-traps).
Once you have your message from King Lathas go to the second floor of Ardougne Palace and speak with him. He will tell you that they have finally finished work on the 'Well of Voyage'. Then he tells you that Tyras and his brigade are camped in the woods to the south of the Elven city. Near the end of the conversation, he tells you that you need to go through the Underground Pass.
Items needed: Spade, Rope, Bow, Arrows, Pestle and Mortar, Armour, Food, Amulet of Glory or Ring of Dueling or Games Room Necklace, Pickaxe.
Go to far West Ardougne, and enter the cave (Map). Make your way west to the agility rocks. Climb over them until you reach Koftik. Speak to him, and he will give you a damp cloth to use on the arrow you brought.
When you have a lit arrow, use it on the fire, then go around behind the ledge and shoot at the bridge support. You will automatically be taken around to the other side, to go over the bridge.
Go into the little room to the north, and pick up a plank. Then go south, then east, and you will come to a void. Use your rope with the overhanging rock to swing across. If you fail, head back to Ardougne and buy another rope.
Keep following the path, climbing over some rocks until you reach the area with the metal grates. Find the correct path to get over them safely. If you take to wrong path you will lose around 15hp. Note that the path you take is random for every person, but your path will remain the same (so it's a good idea to remember it for when you need to come back through later). Don't forget to eat if you fail.
Continue on, and you will come to a narrow passage. There are two options here. You can either run straight through and get hit for about 30hp, or search the odd markings on the wall, and cautiously make your way through (although you may still get hurt). If you lag a lot while playing Runescape, it is best to go slowly, as you may end up running back and forth through the grates and being hit multiple times.
Step 2
Climb down Well.
Picklock first cage on left.
Dig up the mud.
Cross ledge.
Pass agility or thieving obstacles.
Go through the pipe.
Put plank on flat rock (after Paladins).
Once you have passed the wall-traps, you will be in a room with a well. Climb down the well and keep going straight ahead to the cages. Picklock the first cage on the left which has a pile of mud in it. Stand beside the pile of mud, and click "Dig" on your spade. You will fall through the ground: go straight ahead, and cross the ledge. If you fall down just go back up the passage and picklock the door, dig the mud and try again.
If you have 50 thieving go straight ahead (behind the agility obstacle area) and picklock the fences. There are only two fences which you need to picklock. Otherwise, you will have to go through the agility obstacles, with pits of spikes. Navigate all the way across and you will be safe. Once you've made it through, head around to the pipe.
Once you've past the agility or thieving obstacles, squeeze through the pipe and go through the cave entrance at the other end. Keep moving on past the zombies until you reach the Paladins. From the Paladins, go west to a flat rock on the ground. Use your plank with the flat rock to cross.
Step 3
Go through skull doors.
Head west to NW norner.
Head south, take 3rd ledge.
Follow path on map (right) to Temple of Iban.
Enter the temple, climb down the well.
Follow the cave to leave the Underground Pass.
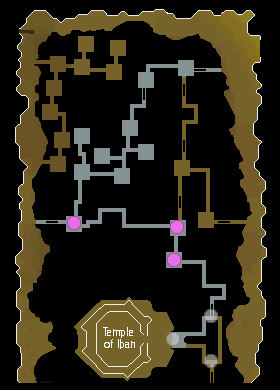
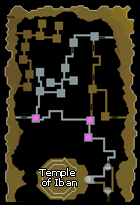 Go forwards past the well, and through the skull doors (Map). Head west, along the edge of the gaping chasm, until you reach the north-western corner of the cavern. Now head south past two ledges (these have cages on them). Take the third ledge - you have to jump over a gap.
Note: You can fail when trying to jump over the gap. You will fall to the cavern floor, and sustain considerable damage. Make sure you have high health when attempting these.
Take the ledge east, and then south (you will have to jump across a couple more gaps), and you will soon see Disciples of Iban. Continue, and you will arrive at the Temple of Iban; otherwise known as the Well of Voyage. If you fail jumping over a ledge, head north-west and climb up the cave. Then head south, to where you started from.
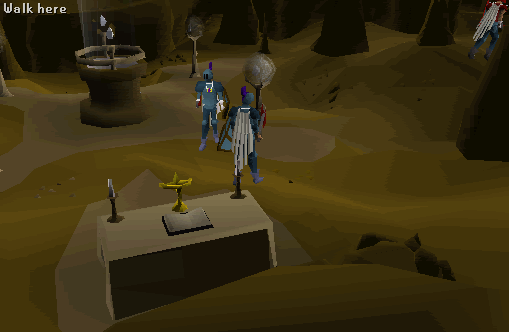
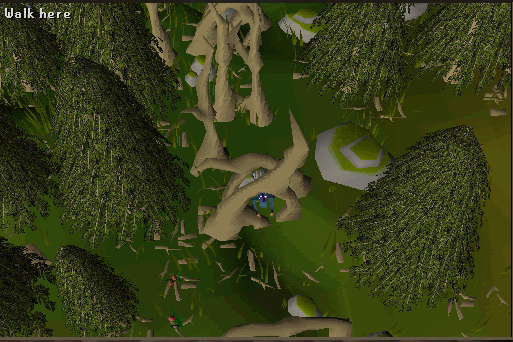
Once you are at the Temple of Iban, walk straight in, and climb down the well (Picture - Picture). Follow the cave, and you will come to an exit. Leave the underground pass, and enter Tirannwn.
Part 2:
Tirannwn
Caution: There are many traps in Tirannwn. Watch your step.
Step 4
Head west, jump over leaves.
Cross pass-sticks trap near blue hillock.
Walk south-east to Tracker, then north-west.
Jump over leaves, continue north to Elf camp.
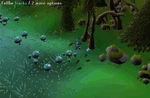
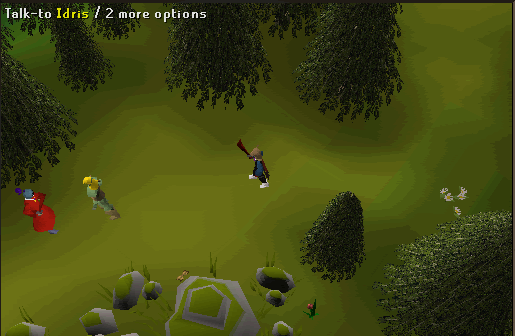
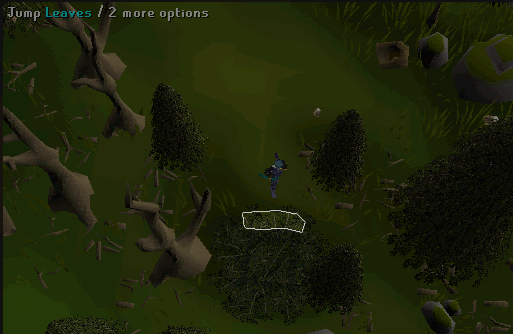
Welcome to Tirannwn! Head west, and if you look in the mini map, you will see a path leading north-west; follow it. Soon, Idris appears (Picture) she will be killed by two Elven archers - Morvran, and Essyllt (Picture). Continue on the clear path until you come across a patch of leaves. Ensure that you are centered before the patch of leaves. Then click just in front of your feet, and you will jump over them correctly (Picture). Continue walking, and you will soon come to a bluish hill with some blue mushrooms on it.
Just near the small blue hill, is a "pass-sticks" trap. Cross that Trap, and walk south-east until you come to the tracker. Remember the tracker's location, as you need to come back here later.
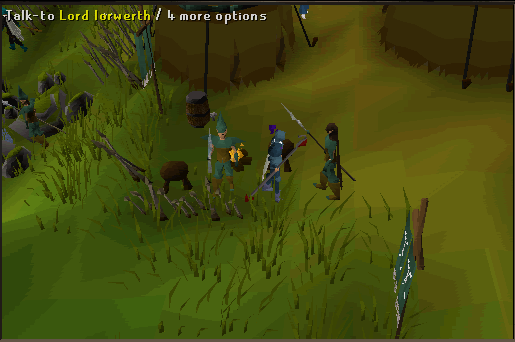
Head north-west and you will come to another patch of leaves. Jump over them, and continue north. Cross the balancing log and head north to the Elf Camp. Speak to Lord Iorwerth in the middle of the camp (Picture). He will tell you to see the Tracker.
Step 5
Go to Tracker.
Go back to Lord Iorwerth for Crystal Pendant.
Grab a pot, go back to Tracker.
Follow footprints on ground, speak to Tracker.
Head east from Elf camp and mine limestone.
Go to Tracker.
Make your way south-east, back to the Tracker; watching out for the patch of leaves. Speak to the Elf Tracker (Picture), and she will say that she needs proof that you work for Lord Iorwerth.
 Trot on back to the Elf Camp, and speak to Lord Iorwerth again. He will give you a Crystal Pendant. Before you leave, grab a pot that spawns in the tent north of the loom. Take the pendant to the Tracker, and she will believe you. She tells you about certain happenings, that she wants to investigate. She asks you to search to the west, while she searches to the east.
Go west, and you will see foot prints on the ground. Right click them and select 'Follow' (Picture). Once you have done that, go back to the tracker and speak to her. You will now be able to go through dense forest (Picture). Head back to the Elf Camp; make your way to the east of the camp, near the bridge, and climb through the dense forest. Continue north-east, and you will soon come to a pack of Dire Wolves (level-88) guarding a limestone mine. Mine one piece of limestone, and head back to the Tracker.
Part 3:
The Tyras Guard
Step 6
Go through dense forest & kill Tyras Guard.
Go around corner (caution: tripwire trap).
Through dense forest, go NW until Catapult.
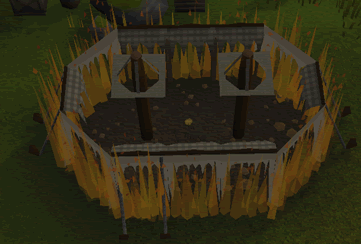
Talk to Tyras Guard, then go south into Tyras Camp.
Grab a barrel and use your limestone on the furnace. You must read the book of big bangs, until you can use the limestone.
Speak to General Hining.
Make your way through the dense forest to west, to the Tyras Guard (Level-110). One will attack you, and you need kill it. It is wise to turn on the protect from melee here.
 Once you've done that, head north-west around the corner, and stop. There are two traps here. If you trigger them (whether by failing the trap or walking straight over), you will take 10-15 damage, and be temporarily poisoned. Carefully step over the tripwire, and then go through the dense forest. Head north-west until you arrive at a catapult.
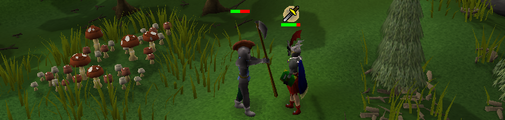
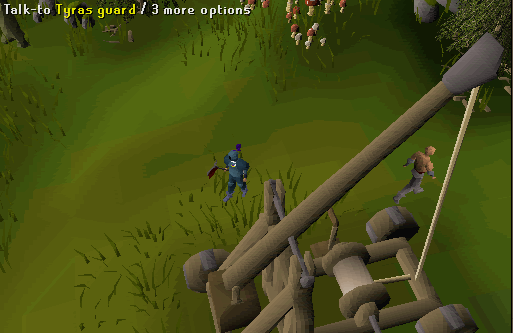
Speak to the Tyras Guard by the catapult. He'll say he's been out there for a long time and that he's hungry (Picture). This piece of information is useful later on when you need to use the barrel bomb. Head south of the catapult, and you will see another Tyras Guard. Go through that dense forest, and you'll be in the Tyras Camp (Picture).
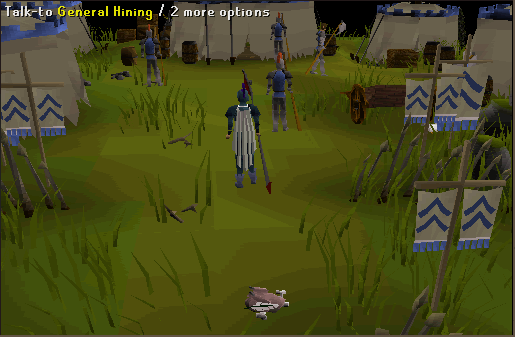
Take a Barrel (Picture) from the ground (take more then one incase the first does not work). While you're here, if you've already mined the limestone and have the pot from the elf camp, use it on the small furnace to obtain quicklime. Caution: if you are not wearing gloves you will be dealt 8 damage. Speak to General Hining, and ask if you can see the king. He will say the king sees no one; then that "the King will stand between us and the end."
Step 7
Talk to Tracker.
Talk to Lord Iorwerth.
South of Tracker, fill barrel with tar.
Grab some sulphur.
Head back to the Tracker with your barrel and knowledge of the Tyras Guard. Tell the Tracker that there's a camp to the west; she'll say the lord will be happy to hear that. Head back to the Elf Camp, and tell Lord Iorwerth this. He will tell you the camp must go, and he will give you the Big Book of Bangs. Read it.
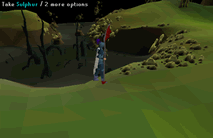
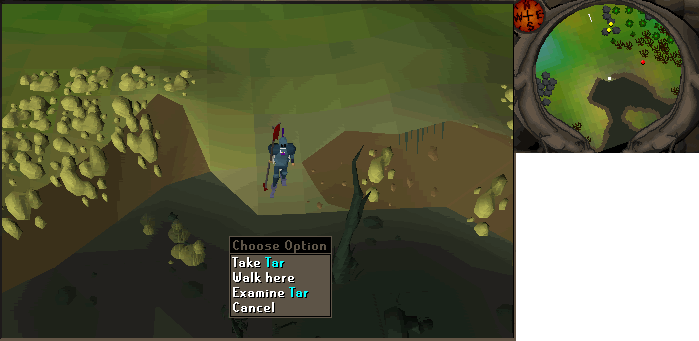
Now you need to gather the rest of the materials for your bomb. Head back to the Elf Tracker, and make your way south of her to the Poison Waste. Use the barrel with the "Tar" at the inlet (Picture) to make a barrel of coal tar, and take a piece of sulphur (Picture).
Note: Use the sulphur with a pestle and mortar to be able to add it to the bomb.
Part 3:
A Spot of Chemistry
Step 8
Take ingredients to Chemist (see right).
Use book with Chemist.
Operate still (see right).
Now you have to take the bomb ingredients to the Chemist in Rimmington. The items you need are: Sulphur, Barrel of coal tar, Big book of bangs (see step 9); about 15-30 coal (8 minimum without a fail).
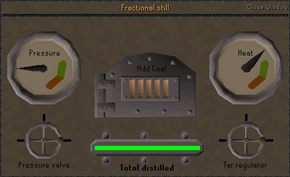
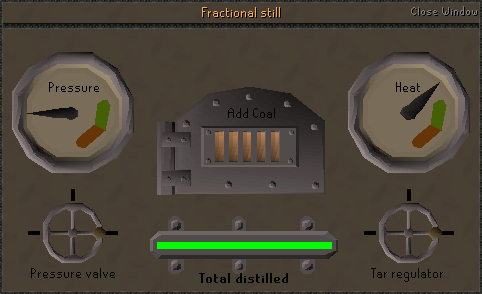
Use the Big book of bangs with the Chemist, and he will tell you that you need to use the Still outside. He will tell you how to operate it. Head outside an use the barrel of coal tar on the still.
- Use the barrel of coal tar with the still.
- Click operate.
- Add two or three coal. The heat bar will rise.
- Click the tar regulator (twice) until the knob is to the right of the wheel. Do not let the heat gauge fall much lower than the green region.
- Watch the pressure, and if it starts going up towards green, click to make the knob go to the top of the wheel.
- Continue adding coal (about two or three every few seconds), and keep the heat around the green/ red area, and the tar should begin coming out as a green bar.
- Click the tar regulator wheel, so the handle is pointing right. The pressure may rise, and you will get a bit of Naphtha. The Naphtha should continue coming out if the heat is high enough, if the tar regulator is pointing right, and if there is little pressure.
- You now have a Barrel of Naphtha.
Step 9
Head back to Elf camp.
On the way kill a rabbit for its' meat.
Make fuse and cook meat at Elf camp.
Now that you have the Naphtha, you need to make the bomb and head back to Tirannwn through the Underground Pass (follow instructions of Part 1).
Items needed for Underground Pass: Spade, Rope, Bow, Arrows, Food, Plank (or leave a free space), Amulet of Glory or Ring of Dueling or Games Room Necklace.
Items needed for Bomb: 4 Balls of Wool, Barrel of Naphtha, Ground Sulphur, Pot of Quicklime (or Pickaxe, Pot and Mortar and Pestle if you haven't mined the Limestone yet, or Limestone Brick, Mortar and Pestle and a Pot if you haven't put it in the Tyras Camp's furnace yet) and a Tinderbox.
Once back in Tirannwn head to just north-west of the Tracker. Kill a rabbit, grab its' meat, and take it to the Elf Camp to cook it. While you're there weave a cloth on the loom (using your four balls of wool); the fuse. Once you have some cooked rabbit meat and the cloth, head to the Catapult out the front of the Tyras Camp.
Part 4:
The Grand Finalé
Step 10
Assemble the bomb.
Head back to the Catapult.
Give cooked rabbit meat to the guard.
Use barrel bomb with catapult.
Go to Tracker, then Lord Iorwerth.
If you haven't already, and if you have the limestone and pot with you, use it on the small furnace to obtain some quicklime. Grind it with your mortar and pestle and it will automatically go into your pot.
Assemble the bomb in this order: use the pot of quicklime with the barrel of naphtha; then use the ground sulphur with the naphtha mix; lastly, use the cloth (fuse) with the barrel bomb. Now head back to the catapult.
Once the catapult guard has the meat, he will be distracted, so you can use the bomb (note that you must have a tinderbox in your inventory to do this). Use the barrel bomb with the catapult. You will automatically wind, and release it, and will soon be watching a spectacular blaze.
Once the cinematic view of the blast has ended, return to the Elf Tracker, who will be pleased, and will refer you to Lord Iorwerth. Head north-west to the Elven Camp, and speak with him. He will thank you, and give you a message to give to King Lathas.
Step 11
Leave Tirannwn through Arandar, or teleport out.
Go to King Lathas' palace.
Collect your reward.
You are now able to take the shortcut through Arandar to get back to Ardougne. If you wish to teleport out rather than go through Arandar, you may do so. Otherwise, head south-east of the Elf camp, and go through the dense forest. Head south of the bridge (Picture), until you reach the blue hill with 2 small lakes.
Now head east, then north-east, then east again, and you will soon come to a patch of leaves. Jump over it, and head north-west to where you come to some dense forest. Go north through the dense forest. Head north to the log bridge, and cross it. Head north-east (don't forget to jump over the trip wire) to the pathway and follow it until you reach a fork in the road.
Take the north-east path, and you will come to a huge gate (Picture). Open the gate, and go north-east, and you will end up at the Tree Gnome Stronghold. If you took the north-west path, you will end up at another entrance to Prifddinas.
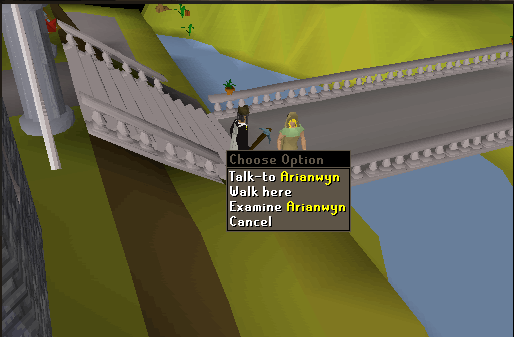
Now that you're out of Tirannwn, go to King Lathas' palace in western East Ardougne. When you arrive at the gate, Arianwyn will speak with you (Picture), and will read the message to you. Arianwyn says you were working for the wrong side, and asks you to speak to King Lathas as if you hadn't met her. Go to King Lathas to collect your reward.
Frequently Asked Questions
Q: Do I need to complete the Regicide quest in order to wield other Halberds?
A: No, you must only complete the quest to wield the Dragon Halberd.
Q: I'm F2P and I got the King's Message, what do I do with it?
A: You can drop it. The Kings Message is only used to notify you that you have to speak to King Lathas, this also means that you can drop it once you've read it on P2P. |


 OSRS RuneScape Help
 RuneScape Community Forums
 Skill Guides
 Quest Guides
 City Guides
 Guild Guides
 Mini Game Guides
 Treasure Trail Help
 Miscellaneous Guides
 Dungeon Maps
 Mining Maps
 Items Database
 Monsters Database
 Shops Database
 Tome/Books Database
 Skill Calculators
 Coordinate Locator
 Zchat Clan Chat


 Stuck on something? Want some more tips? Ask on our forums.

