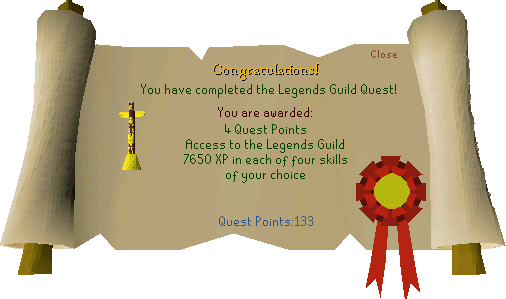
Reward
- 4 Quest Points.
- 7,650 XP in 4 skills of your choice.
- Ability to wield Dragon Square Shield and Legends' Cape.
- Access to the Legends' Guild. |
 Start Point Start PointTalk to Legends' Guild Guards located north-east of Ardougne. Members Only |
Difficulty:

Length:
|
Requirements
Skill: 50 Woodcutting, 50 Crafting, 50 Agility, 50 Smithing, 42 Prayer, 50 Thieving, 52 Mining, 50 Strength, 45 Herblore (or 44 with a Greenman's Ale), 56 Magic.
Quest: 107 Quest points, Heroes Quest, Family Crest, Underground Pass, Waterfall Quest, Shilo Village.
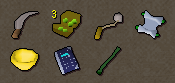
Item: Rune Hatchet, Charcoal, 3 Papyrus, 2 Gold Bars, Hammer, Water, Earth and Body Runes - Enough to cast a few Weaken Spells, Rope, A few Lockpicks, Pickaxe, Water-Filled Vial, Soul, Mind, Earth and 2 Law Runes (Remember S.M.E.L.L.), Cut Sapphire, Emerald, Ruby, Diamond, Jade, Opal and Red Topaz, Runes to cast any Charge Orb Spell, an Orb.
Other: Ability to defeat Nezikchened (Level-187).
Recommendations
Skill: 60 Attack, 60 Strength, 43 Prayer.
Item: Dragon Long/Dragon Scimitar/Whip/Barrows, Monk Robes, Amulet of Glory(4) (or Glory Amulet on the wall of your House), Prayer Potion - 30 should be good, Food - Sharks are the best, Gauntlets/Ice Gloves, Energy Enhancing Items (Boots of Lightness, Spotted/Spottier Cape, Super Energy Potions, etc), Stat Restore Potions, Ardougne Teleport Runes, Extra Gold Bars, Extra Charcoal, Extra Papyrus, Extra Uncharged Orbs, Extra Orb Charging Runes, Extra Rope.
Part 1:
Starting and Mapping
Step 1
Enter the Legends guild.
Talk to Sir Radimus Erkle.
Receive your Mission Briefing.
Use your Ardougne Teleport to get to the Legends' Guild the fastest. Proceed east out of the city, and then go north through the mine. You should now see the Legends' Guild Guards guarding the gate to the Legends' Guild. After talking to the Legends' Guild Guards, you will be allowed to enter the courtyard freely.
Go down the path and enter the building on your left. Talk to Sir Radimus Erkle, who will explain what you have to do to get into the Legends' Guild. Once he is done talking he will give you Radimus Scrolls. Search the cupboard for a machete.
Read the Radimus Scrolls to learn more about the quest set out for you. If you ever lose the items, the scrolls can be bought for 30gp from Erkle, and the machete can still be taken from the cupboard again. The Mission Briefing says you must bring back a map of the Kharazi Jungle and a gift from the Natives for the Legends' Guild.
Step 2
Head to the Jungle in Southern Karamja.
Enter the Kharazi Jungle.
Map each of the three regions.
Exit the Jungle and receive a Bull roarer from the Forester.
 Now go to the southern end of Karamja Island where you will see a divider between you and the rest of the Jungle.
The fastest way to do this is teleport to Ardougne then take the boat to Brimhaven, Karamja. Talk to Hajedy to get a ride to Shilo Village for 10 to 200gp. Go east to the Shilo Village bank. Make sure that you have your Radimus Scrolls, Charcoal, Papyrus, Machete, and Hatchet. Be sure to bring extra Charcoal and Papyrus because they can break. You will need the Radimus Scrolls, Hatchet, and Machete for the entire quest so don't bother leaving them in your bank unless you have a good reason. Now you may exit Shilo Village.
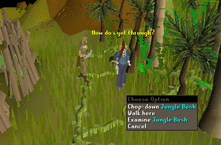
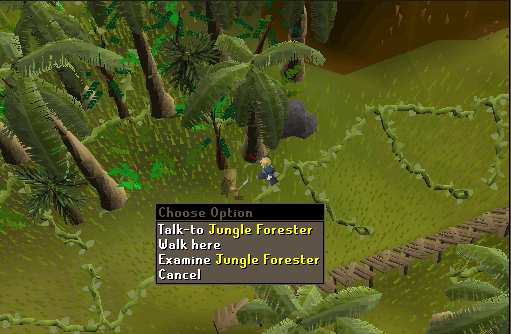
The Radimus Scrolls, Charcoal, Papyrus, Hatchet, and Machete are required to this part of the quest. Before you enter the Kharazi Jungle you will see a Forester at the entrances. Talk to him and say you plan on mapping the foreign lands of S. Karamja (Picture).
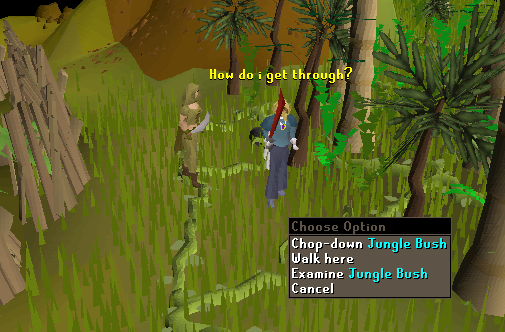
Now, enter the Jungle, south of Shilo Village, at one of the three locations possible (west, central, or east), by hacking your way though Jungle Brush, and Trees (Level 50 Woodcutting). Beware of the Jungle Wolves (Level-64), Jungle Savages (Level-90), and the Oomlie Birds (Level-46) that roam the Jungle. Once you are in the Jungle right click on your Radimus Scrolls and select the "Complete" option (Level-50 Crafting). If you successfully map that section of the jungle, you will be notified of which you have yet to complete. When you are done mapping all three sections, you will be congratulated.
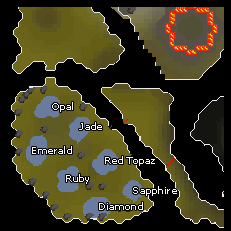
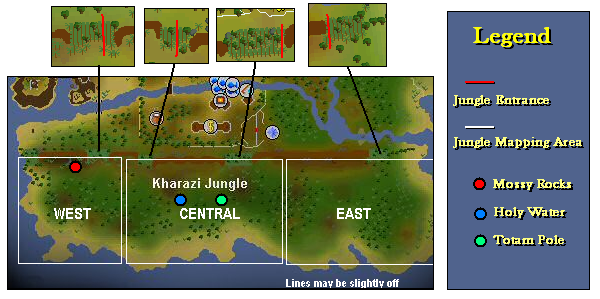
Now exit the Jungle at any location and talk to the Forester Again. He will reward you with a Bull Roarer which is essential for the rest of the quest. Congratulations, you have completed part two of the Legends Quest. The easiest ways to enter/exit the jungle through all three entrances, the areas you need to map and significant points are shown here in this map.
Part 2:
Getting Yommi Seeds
Step 3
Spin the Bull roarer to summon Gujuo.
Learn about the Totem pole.
Enter the cave nearby.
Talk to Ungadulu, and find out about the Holy water.
Talk to Gujuo and find out about the Golden bowl.
Make a Golden bowl.
Cut your way into the jungle, and then spin the Bull Roarer which will make a strange noise. If you fail you may attract some of the monsters within the jungle, so beware. It may take a few tries but Gujuo, a Kharazi Jungle Native, will eventually appear. When you tell him that you are on a quest to get a Native Totem Pole, he will say that Ungadulu has the only seeds that will grow the tree needed for the statue.
Go to the north-west part of the Jungle to find two mossy rocks and one other rock, forming a triangle. Search one of the rocks and select to attempt to go down the passage (Level-50 Agility). If you fail, you will lose 5HP and you will have to try again.
When you're down there you will see a star-shaped firewall, with Ungadulu trapped in the center
. Approach and Right Click on the flames, then select "Investigate". Do not "Touch" the firewall yet, for you will be hit for high damage. Continue the conversation and you will notice that Ungadulu acts very strangely. Ungadulu will eventually say that only Holy Water can douse the flames, and then finish the conversation.
Get out of the cavern, by the same means that you got down (Picture), and swing your bull roarer again. Gujuo will again appear to tell you that only a 'blessed vessel' made from the 'metal of the sun' can hold holy water and will give you a sketch of it. You now need to make a Golden Bowl, which is the vessel Gujuo described.
Exit the jungle and use the gold bars (multiple because you could fail) on the anvil in Tai Bwo Wannai (Level-50 Smithing) and select 'Yes' to make the bowl. There is a possibility that you will fail.
Step 4
Enter the Kharazi Jungle again.
Bless the Golden Bowl.
Cut a hollow reed and use it to fill the Bowl with water.
Get inside the Star-shaped area.
Get the Shaman Tome from Ungadulu's desk.
Enter the tunnel through the bookcase.
Penetrate deep into the Tunnel.
Items needed: At least one Prayer Potion, Runes to cast a few Confuse, Curse, or Weaken Spells, a Picklock, a Pickaxe, Armour, your S.M.E.L.L Runes, Amulet of Glory(4), 200GP, your Sapphire, Emerald, Ruby, Diamond, Jade, Opal and Red Topaz Gems.
Take the bowl back to the Kharazi Jungle, and swing your Bull Roarer to make Gujuo appear again. You will then begin to meditate (Level 42 Prayer) by saying phrases like 'ohhhhhhmmm', and if you are successful your golden bowl will be blessed. If you fail, your prayer will decrease by 5.

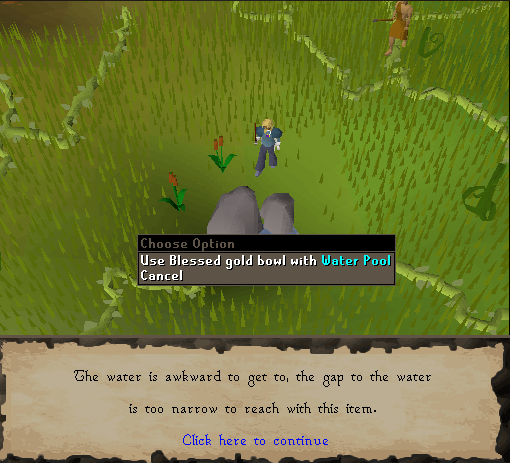
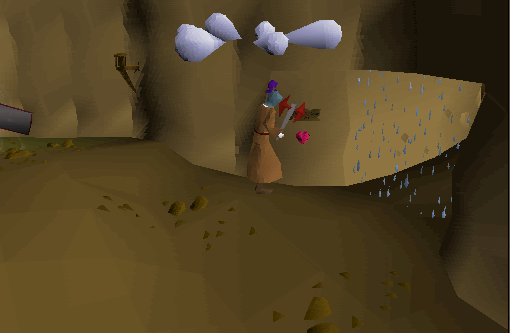
Now go to the "Pool of Water" in the centre of the Jungle and use your Blessed Golden Bowl with it. You won't be able to do this so you need to find another method (Picture). "Use" your machete on the Tall Reeds. You will then get a Hollowed Reed which you then use on the Pool. By doing this you will siphon water into your bowl (Picture).
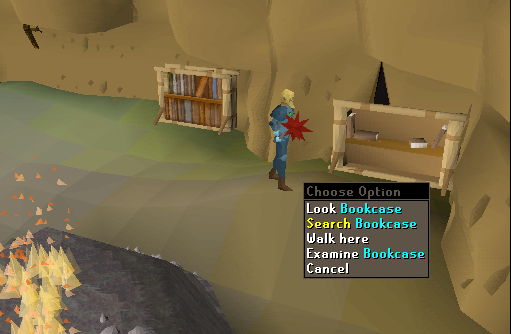
Go back down to the caverns again, by searching one of the three rocks. Use your bowl of Holy Water on the flames. Go stand beside the table and then fire one or two Confuse, Curse, or Weaken spells at Ungadulu. Quickly search his desk for the Shamans Tome. If he catches you he will throw you out (Picture). If Ungadulu hasn't thrown you out already, use your Bowl of Holy Water on the flames to get out. Next search the bed and table outside the octagon of fire, for two Scuffled Notes. Make sure you read both notes and the Shamans Tome. The Tome tells you that the evil sprits are weakened by magic and the two other notes are a journal of Ungadulu's thoughts.
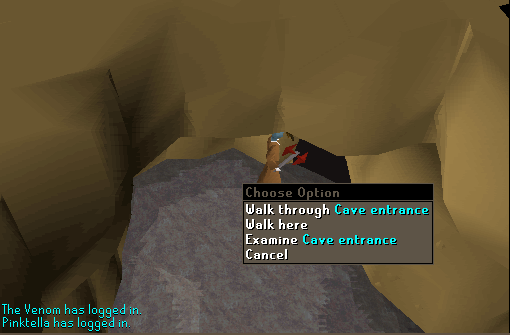
Now 'Search' the bookcase with no books in it on the north wall. When it asks if you want to try to enter the crevasse select 'Yes I'm nimble and agile' and you will proceed though the small tunnel (Picture).
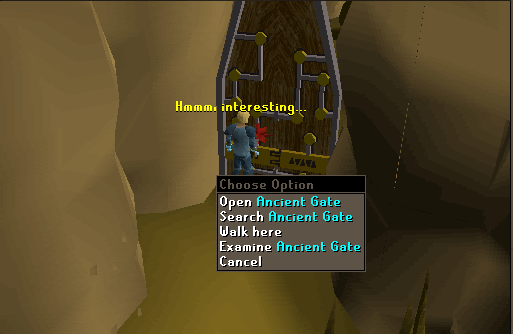
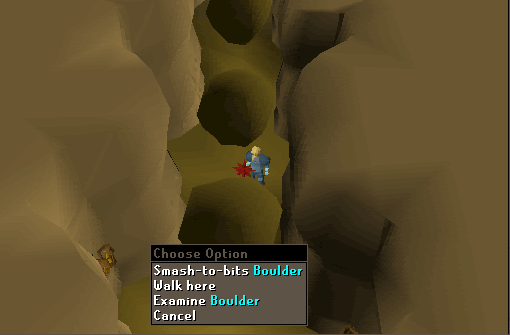
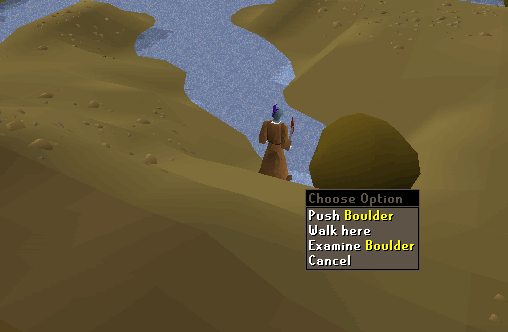
You'll now encounter a very complex Ancient Gate. Search it and you will attempt to pick the lock on it using a Lockpick (50 Thieving) (Picture). Now you will see 3 large stones ahead of you. Select 'Smash-to-bits Boulder', and you will attempt to smash the big rock with your pickaxe (Level 52 Mining). If you are successful you will walk passed the rubble and another boulder will fall into place, but if you fail, you mining level will be decreased by (Picture).
Step 5
Force the Ancient gate open.
Search the marked wall and use the SMELL runes one them.
Place the gems on the appropriate carved rocks.
Receive the Book of Binding.
Get the Yommi seeds from Ungadulu.
Release Nezikchened by using the Book on Ungadulu, then defeat it.
 Items needed: Sapphire, Emerald, Ruby, Diamond, Opal, Jade and Red Topaz Gems.
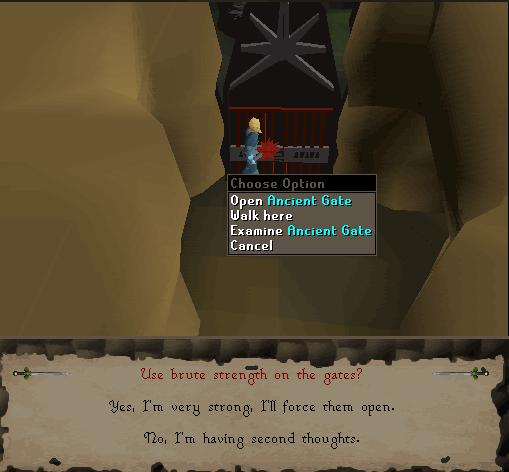
You should now see another Ancient Gate. This one will require you to force it open (Level 50 Strength). Click 'Yes I'm very strong I'll force them open' and you will try to force them open (Picture).
You will now find yourself in a room full of Death Wings (Level-83). Run past them, around the corner to a Jagged Wall and attempt to 'Jump-Over' it. You may fail and lose some Hitpoints.
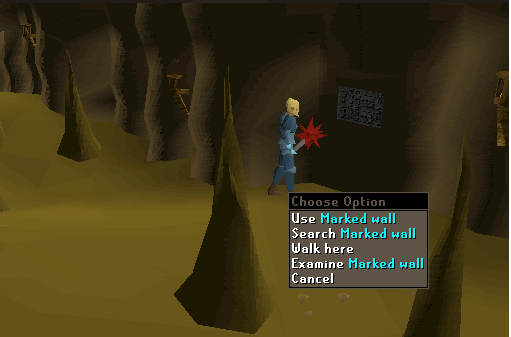
Now 'Search' the Marked Wall that you will see on your characters left hand side. Use your Soul, Mind, Earth, and 2 Laws on the Marked Wall, in the order they appear in the word SMELL. This will give you unlimited access to the next room by clicking the 'Use Marked Wall' option (Picture).
Now you will find your self in a room of seven pools. Use your Sapphire, Emerald, Ruby, Diamond, Opal, Jade, and Red Topaz gems on the 'Carved Rocks' until you fit one on every stone. The Order of which the gems fit are random for each player. When you complete this you will be lifted up, and moved to the centre of the room, where bright lights will flash, and the 'Book of Binding' will appear (Picture). Teleport using your Charged Amulet of Glory to Karamja, and then walk to Brimhaven. Once there, speak to Hajedy to get a ride to Shilo Village.
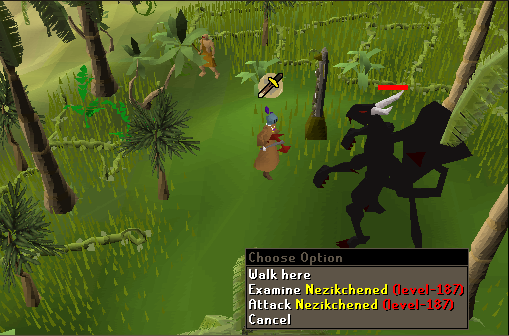
Now talk to Ungadulu who will give you the Yommi seeds you needed to make the totem pole. Also, from this point on, the spell cast on you by Nezikchened will allow you to walk through the Flames without Holy Water. Use the Book of Binding on Ungadulu to release Nezikchened (Level-187). Fight and kill Nezikchened, then speak to Ungadulu. Here are the items you should have so far from the quest:
Part 3:
Yommi Seeds and Totem Poll
Step 6
Attempt to siphon more Holy water, but the pool has dried up
Try to plant the seeds, but it requires water for growing.
Try to siphon more water, but the pool is still dried up.
Gujuo tells you to go deeper into the Cavern, and tells you to make a Bravery Potion.
Get some Snake weed and Ardrigal, then mix them for the Potion.
Now that you have your Yommi Seeds, you can plant them to grow a Yommi Tree! All you need to do is get some fresh 'Holy Water' from the pool. If your Golden Bowl still has water left in it click 'Empty Golden Bowl'. Now exit the caverns and head towards the pool of water. Cut a reed and then attempt to siphon the water into your Blessed Golden Bowl. You will find that the water has dried up.
Now, go back to the pure water and cut a new reed. Next, fill up your blessed bowl and use the Yommi seeds on them. Now call Gujuo with the Bullroarer and ask him what to do. He will tell you that you need to plant the seeds. Go look for a spot of fertile ground and try using the seeds on them. It will say that you need water for growing the seeds with. Go back to the pure water and cut another reed. Try filling up your bowl again but it will say the pond is dry. Swing your Bullroarer to call for Gujuo again. He will tell you that evil spirits are at work and you must go deeper into the caverns to see what is wrong. However, in order to be brave enough to venture so far into the caves you must make the 'Bravery Potion'. He says that you will need to find Snake Weed and Ardrigal to make it.
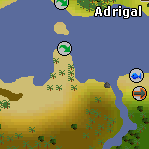
The Snake Weed is located south-west of Tai Bwo Wannai and north of Cairn Isle. There are two 'Marshy Jungle Vines' which can be searched to get the Snake Weed. Ardrigal is found north-east of Tai Bwo Wannai, east of the cliffs, on a Peninsula with a number of palms covering it. One of the palm trees will have a Search option which is where you will find the herb. These herbs must be identified first before you can do the next step (Ardrigal) (Snake Weed). Exit the Kharazi Jungle and head north-east of Shilo Village until you find a bridge. Cross it then keep going north-east until you see a bunch of skinny islands. Here you will find the 'Marshy Jungle Vine'. When you have the Snake Weed head north-east, between the two bodies of water, past Tai Bwo Wannai, and then east of the cliffs. You will then find the peninsula of palm trees where Ardrigal can be found on the map to the right.
Use the 'Snake Weed' with a Water Filled Vial then mix in the 'Ardrigal'. You will then have a Bravery Potion.
Step 7
Enter the Jungle, then go to the Cavern with the Carved rocks.
Cast "Charge Orb" and go through the gate.
Drink the Bravery potion, then climb down the Winch using a rope.
Climb down the rocky ledges to the floor below.
Slay the Spiritual warriors, then take the piece of Crystal from each.
Use the Crystals on the furnace to receive a Crystal heart.
Place the Heart on the Mossy rock resembling the "Eye of the Dragon."
Items needed: Radimus Scrolls, Machete, Blessed Golden Bowl, Hatchet, Picklock, Pickaxe, Runes to Cast a Charge Orb Spell, an Orb, 200 coins, Rope (Optional), Bravery Potion, about 7 Sharks, 9 Prayer Potions, Dragon Long, Monks Robes, Boots of Lightness, Gauntlets, A Helmet (optional), Charged Amulet of Glory.
Enter the Kharazi Jungle then make your way back into the caverns. Go back in the room with the pools of water. You will not need your S.M.E.L.L runes to get through the Marked Wall again.
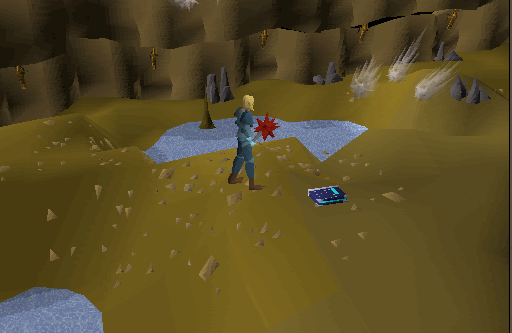
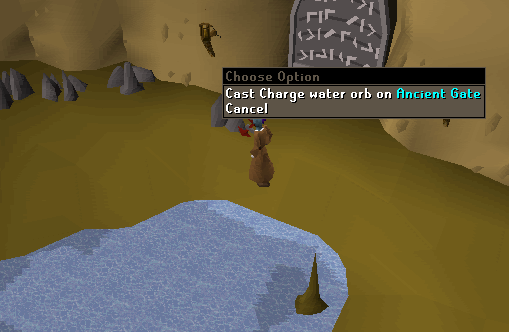
On the north side of the room you will see an Ancient Gate that appears to be quite solid. Cast any one of the four 'Charge Orb' spells on it and you will find yourself on the other side of the door (Level 56 Magic) (Picture) (Picture). Keep in mind that you will need to have an orb in your inventory to perform this step but will shatter during the process (Picture). By doing this you are not granted unlimited access through the doors. The spell needs to be cast every time you need to pass through.
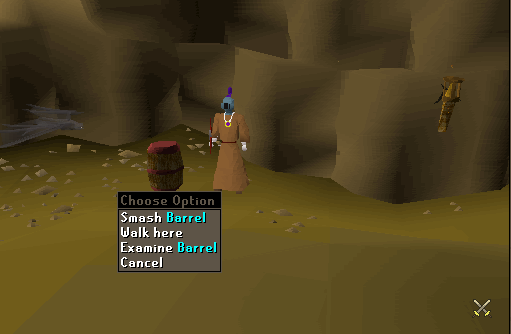
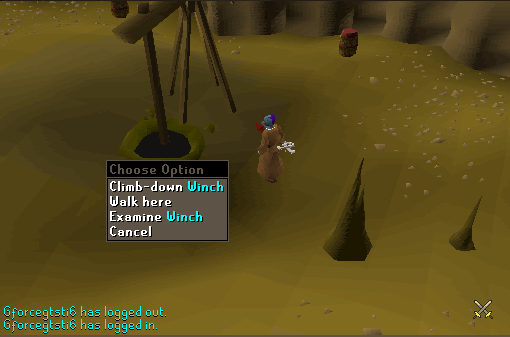
In this room you will see a large number of barrels and a large 'Winch' in the middle. If you did not bring a rope with you, you may attempt to smash the barrels to get one (Picture). Be warned though, as the barrels may contain high leveled monsters. If you try to climb down the winch you will be overcome with fear, so before you attempt to do so drink your 'Bravery Potion'. When you get a rope use it on the winch (Picture), and then quickly "Climb down" it (Picture).. Although you may receive large amounts of damage, a large fall early on is not a bad thing. It actually helps the process go by a bit faster.
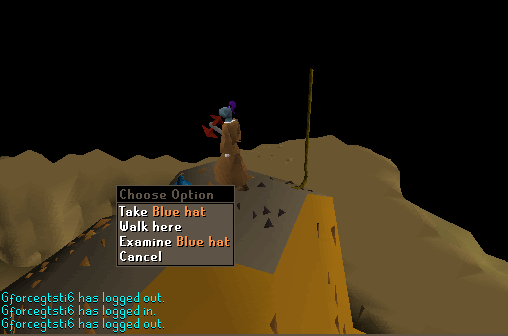
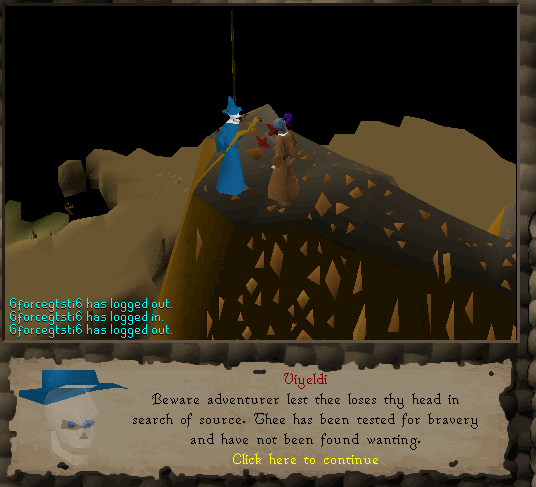
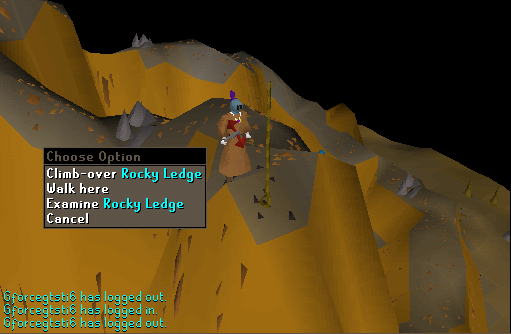
You will find yourself on top of a large ridge looking down to the grounds below. Beside you, you will see a blue hat (Picture). You may attempt to take it, but then a ghost named Viyeldi will appear. Viyeldi guards the exit of the large cavern you are currently in, knows as Viyeldi's Caves. All he will warn you about the dangers of the cave (Picture). Start climbing over the 'Rocky Ledges' and make your way down to the caves floor (Picture). There are three things that could happen while crossing the ledges. A successful crossing of these ledges will cause you no harm. If you have a near fall you will hang onto the edge of the cliff (Picture) and then climb up onto the other side of the ledge with a loss of minimal health (5-10 Hp). It is also possible to fall down completely which will result in a loss of massive damage (20-35 Hp). Heal if necessary before doing the next step.
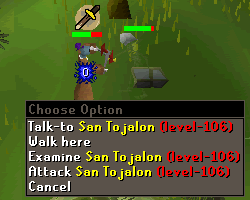
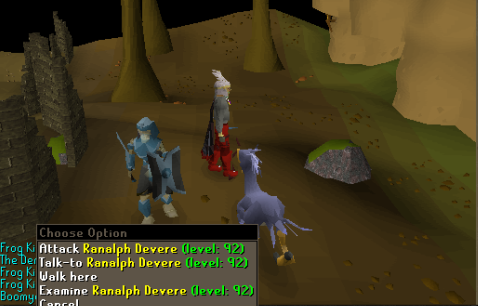
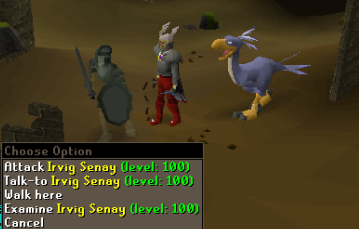
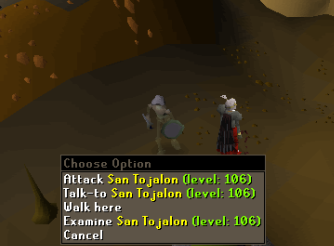
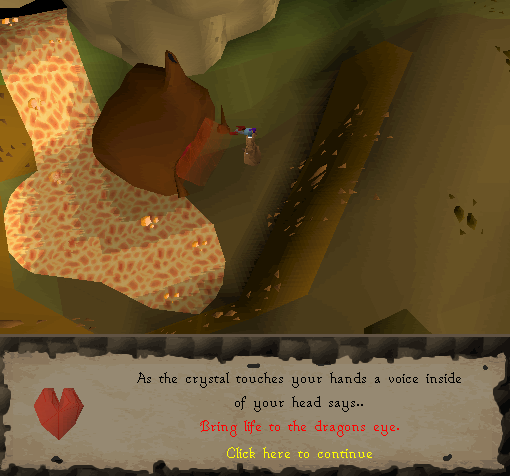
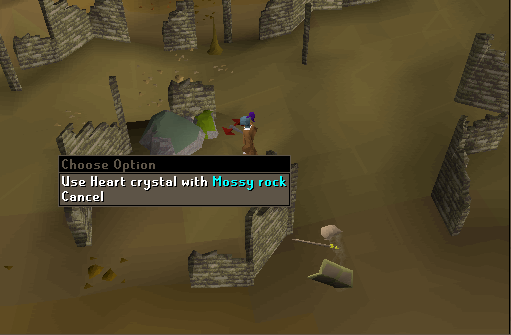
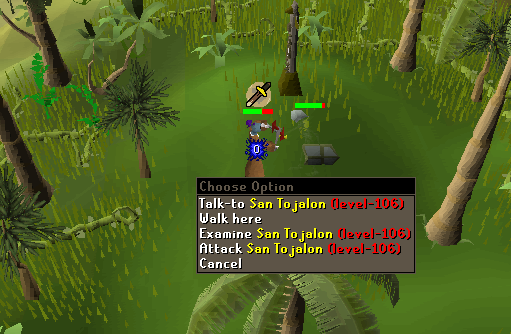
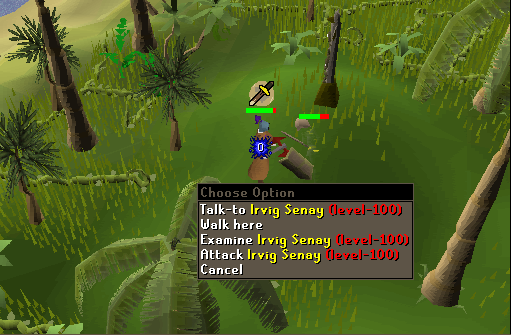
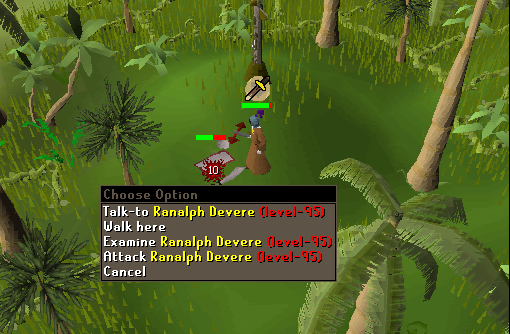
For this step, Protect from Melee in combat and use Accurate/Slash mode. At the bottom of the ridge you will see a few spiritual warriors. The three kinds are Ranalph Devere (Level-95) (Picture), Irvig Senay (Level-100) (Picture) and San Tojalon (Level-106) (Picture). Slay all three of them and you will receive a piece of a crystal from each. Take the three crystals to the north-eastern end of the cavern, and use them all with the furnace. You will receive a Heart-shaped crystal and you will be told to take it too the 'Dragons eye' (Picture). Head slightly south-west and you will see something that resembles a dragon on your map. Go to the 'Eye of the Dragon', Search the 'Mossy rock', then use your heart crystal on it (Picture). It will begin to glow.

Step 8
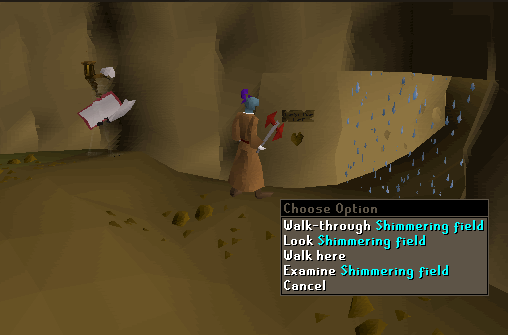
Use the glowing heart on a Recess near the shimmering field, then enter.
Arrive at the alternate Holy water source.
Push a Large boulder and Echned Zekin appears, giving you a Dark dagger to kill Viyeldi.
You have two options, Kill Viyeldi or not.
If you used Option B, use the Holy force spell and Nezikchened will attack you again; Defeat it.
Go to the southern end of the caves when you will see a 'Shimmering Field' (Picture) and a 'Recess' (Picture), with a heart shaped hole, beside it. If you try to pass through the 'Shimmering Field' you will be knocked back. To get through, use your 'Glowing Heart Crystal' with the Recess and you will be able to 'Walk-though' it (Picture).
You are now in a part of the Viyeldi Cave's with numerous Lesser Demons (Level-82). It is not necessary to fight them, so run west without making contact with them. You are now at the Alternate Holy Water source, however the points where you're supposed to obtain the Holy Water are covered by large boulders. 'Push' one of them out of the way (Picture) and Echned Zekin (Level-187) (Picture), a ghost, will appear. He will ask you who has disturbed the rocks of Zekin. When you explain to him that you need to obtain the Holy Water, he says that he will help you if you kill Viyeldi, the ghost you met after climbing down the winch. Echned Zekin will give you a 'Dark dagger' to kill Viyeldi with. Make sure you agree to kill Viyeldi.
Note: Option A is a much quicker option, however you will have a harder time with the last leg of the quest. Option B, which is recommended, will take longer, however you will have an easier time with the last leg of the quest.
Option A: Kill Viyeldi
Head back past the Lesser Demons and through the 'Shimmering Field'. Then, make your way back up the ridge by climbing back over the 'Rocky Ledges'. Don't worry about doing this because you will not fail when climbing back up the ledges. Equip the 'Dark Dagger' then, attempt to 'Take' the Blue Hat to make Viyeldi appear again. Attack him and the dark dagger will begin to glow because his spirit is now trapped inside of it. Make your way back down the 'Rocky Ledges', and through the 'Shimmering Field' to get back to the area with the boulders.
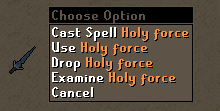
Option B: Holy Force Spell
Killing somebody who helped you along the way, and guards the cave exit didn't seem right to you, so you want to go back and check with Ungadulu to see if this is the right decision. Go back the star-shaped firewall and talk to Ungadulu. He will take the 'Glowing Dagger' and tell you that it was smart not to kill Viyeldi. Ungadulu will give you a 'Holy Force Spell.' Get back down into the Viyeldi Caves. Remember, you will need to cast a Charge Orb spell on the Ancient Gate again. Go through the 'Simmering Field' to get back to the area with the boulders. To get out of the caverns teleport with your Charged Amulet of Glory, then walk to Brimhaven and pay Hajedy to get a ride to Shilo Village. On your way out, pick up an extra orb, runes for any charge orb spell, and a rope. You may also stock up on extra Prayer Potions and Food. Leave Shilo Village and head to the Jungle.
Turn Protect from Melee on and use Accurate/Slash mode when fighting. Attempt to 'Push' a boulder again and the Spirit of Zekin will appear. If you obtained a 'Holy Force Spell' cast it and Echned Zekin will turn into Nezikchened (Level-187) (Picture). Keep prayer points up with prayer restore potions and eat if you get hit. Because you used the holy force spell 30 Hp will be automatically deducted from the Demon, plus the demon's combat stats will be lowered as well. Defeat Nezikchened to move on in the quest. If you killed Viyeldi, Echned Zekin will take the glowing dagger then turn into Nezikchened (Level-187). Defeat Nezikchened to move on in the quest.
Step 9
Push the boulder, then fill your bowl with Holy water.
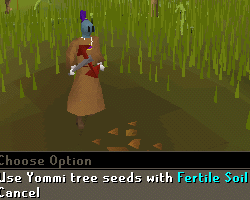
Germinate the Yommi seeds, then Plant them in a patch of fertile soil.
When the tree is a baby, water it.
Water it again as a Sapling, then when it becomes an adult tree, chop it with the axe.
Trim the Yommi tree, then cut it into a totem pole by using the Axe each time.
Lift the Totem pole.
Killing Nezikchened will rid of the 'evil spirits' that were blocking the Holy Water Source. For the final time 'Push' a boulder out of the way and you will stumble upon a pool of 'Sacred Water' (Picture). Use your Blessed Golden Bowl on the pool and you will receive a fresh bowl of Holy Water. If you ever run out of water you siphon some at the original pool in the Kharazi Jungle because you got rid of the spirit that was tampering with it.
Go back to the Kharazi Jungle. It is now time to grow the Yommi tree and make the totem pole. For this you will need your bowl of Holy Water, a Rune Axe, and Yommi seeds. Use your Golden Bowl of Holy Water, on the Yommi seeds to make them germinate. Swing your Bullroarer and talk to Gujuo. You will tell him what you have done and he will congratulate you for it. He will then tell you to find a patch of fertile soil to grow the Yommi tree on. To get out of the caverns teleport with your Charged Amulet of Glory, then walk to Brimhaven and pay Hajedy to get a ride to Shilo Village. On your way out pick up a Rune Axe, your Bullroarer, and your Yommi seeds. You may also want extra Prayer Potions, a Stat Restore Potion and extra food. When you enter the jungle with your Golden Bowl, the Holy Water will spill out. Like I said before you can refill it at the normal spot.
If this step isn't done fast enough, the tree will die or rot (Picture). If you do lose your seeds, you can get more by talking to Ungadulu in the cavern. Find a patch of Fertile Soil (There are many of them around the Kharazi Jungle), and use your Germinated Yommi Seeds on it (Level 45 Herblore). Wait for a baby tree to grow then water it by using your Bowl of Holy water on it. When the tree turns a Sapling water it again. Finally the tree will be fully grown and it will be called an Adult. Use your Rune Hatchet on the tree to chop it down then use your hatchet on it again to trim the branches off. You should now have a Trimmed Yommi that looks like a cross. For the last time use your Hatchet on the tree to turn it into a Totem Pole. To pick it up click 'Lift' and the totem pole will appear in your inventory. Your strength may be lowered in the process (Picture). Drink a Stat Restore Potion to get your strength back to it's full stat.
Part 4:
The Final Showdown
Step 10
Replace the old Totem pole with the new; Nezikchened appears.
Defeat Nezikchened.
If you killed Viyeldi, slay the three spiritual warriors.
 Items needed: Good Armor/Weapon, Food, Prayer Potions.
When fighting use the Accurate/Slash mode in the combat styles menu. When you run out of prayer points, quickly drink some Prayer Potion then turn protect from Melee on. Make sure that you heal any damage you took from the demon during the time you ran out of prayer points. Remember, you can run at any time. Slightly east of the Pool of Water is a Totem Pole. When you 'Look' at the Totem you will be told that the pole is very corrupt. Use your recently crafted totem pole with the old one and Nezikchened (Level-187) will appear (Picture).
If you did slay Viyeldi...
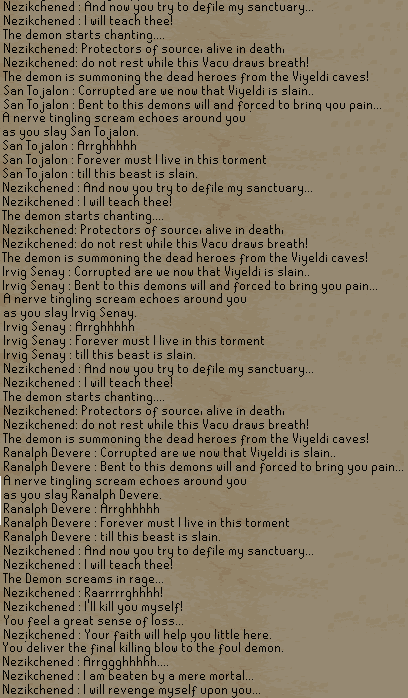
By slaying Viyeldi, you have left the Viyeldi caves open for evil spirits to get out. Nezikchened will summon San Tojalon (Level-106) (Picture), then Irvig Senay (Level-100) (Picture) and then finally Ranalph Devere (Level-95) (Picture). If you manage to defeat all of them Nezikchened will be so outraged he will attack you himself (Picture) (Picture).
If you didn't slay Viyeldi...
Not slaying Viyeldi was a wise decision. The three spiritual warriors are still locked back in the Viyeldi Caves by his power. Nezikchened will attack you (Picture).
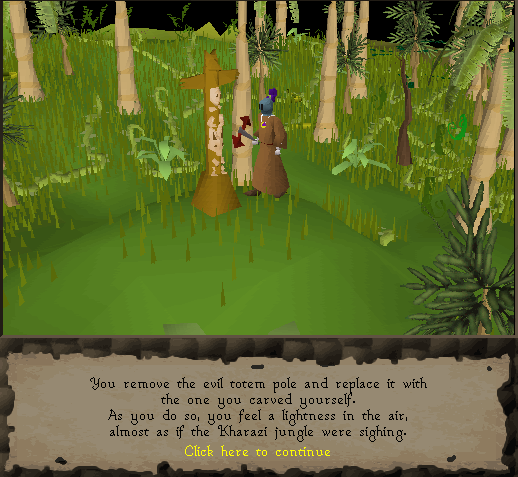
Once you have defeated your opponent(s), you can now 'Use' your totem pole with the corrupt one. By doing this you will replace the Bad Totem with your newly carved one. You will feel a lightness in the air, as if the Jungle was sighing (Picture).
Step 11
Swing the Bull roarer, and Gujuo thanks you.
Go to the Legends Guild, then talk to Radimus Erkle.
Enter the Legends Guild and talk to Radimus Erkle to receive the reward.
 'Swing' your Bullroarer and talk to Gujuo. He will be very thankful because of your work and will give you a Gilded Totem Pole to bring back to Sir Radimus Erkle (Picture). This is the 'gift from the Natives for the Legends' Guild that the Mission Briefing in the Radimus spoke of.
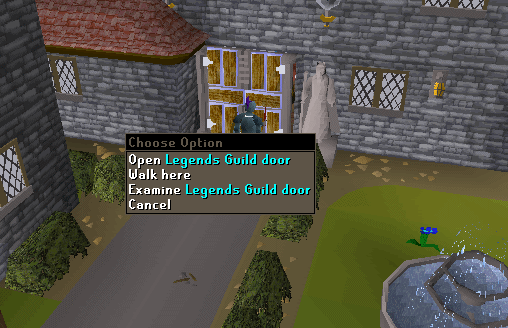
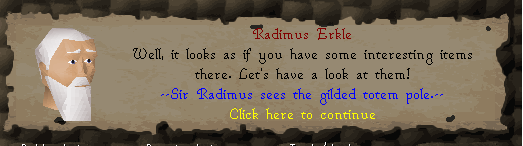
Teleport using your 'Charged Amulet of Glory' to Draynor Village to get Ardougne Runes out of the bank. Teleport to Ardougne, then proceed east out of the city, and then go north through the mine. You should now see the Legends' Guild. Guards guarding the Gate to the Legends' Guild.Go back to Sir Radimus Erkle . Enter the Legends' Guild courtyard, and go into Sir Erkle's office. He will say that it look like you have some interesting items (Picture), and that your map will be very helpful on future expeditions (Picture). Finally he will order some guards to take the Totem Pole into the Legends Guild, and for you to meet him in there (Picture). Exit his office and head north to the Legends Guild Door. 'Open' them and talk to Sir Radimus Erkle.
Frequently Asked Questions
Q: Can I enter the caves for training after I have completed the quest?
A: Yes
Q: How much XP will I get in each skill as a reward?
A: The formula is XP = (Level +1) x 150.
Q: What can I do if I lose the Yommi tree seeds?
A: Speak with Ungadulu who can provide you with more. |


 OSRS RuneScape Help
 RuneScape Community Forums
 Skill Guides
 Quest Guides
 City Guides
 Guild Guides
 Mini Game Guides
 Treasure Trail Help
 Miscellaneous Guides
 Dungeon Maps
 Mining Maps
 Items Database
 Monsters Database
 Shops Database
 Tome/Books Database
 Skill Calculators
 Coordinate Locator
 Zchat Clan Chat

 Stuck on something? Want some more tips? Ask on our forums.

