Table of Contents
1.0 - Introduction
The barrows mini game is one of the toughest mini games to be released thus far. It involves defeating the Barrows Brothers, and desperately trying to make your way through an ancient crypt to arrive at the brothers' chest. Within this chest lies many items, ranging from the exclusive barrows equipment, to magic runes, even Dragon medium helms. Be warned: this mini game is not for the faint-hearted, or weaker players; every turn has some scary, powerful monsters ready to attack! This guide describes what you should bring to make effective trips to the Barrows, and the delights of the brothers' armour and weapons.
1.1 - Requirements and Recommendations
To make the most out of the Barrows mini game, ensure that you have completed the requirements detailed below. First and foremost however, you must have completed the Priest in Peril quest to gain access to the Barrows. Some recommendations that will help you make the most out of the mini game, are also listed below.
Note! These are recommendations. There are in fact no requirements in skill, or armour to do the Barrows mini game. Our recommendations simply make life easier for the adventurer attempting to successfully complete this mini game.
Requirements:
- Level 43 prayer
- Level 55 slayer (for magic dart)
- Level 50 magic (for magic dart)
|
Recommendations:
|
The barrows brothers use all three forms of combat: magic, ranged and melee. Therefore, it is imperative that you come well equipped, to combat these vengeful war gods.
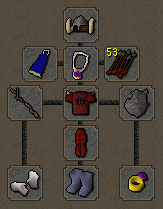
To successfully defeat the brothers, and make the most out of a trip to the Barrows, below are some recommendations for the equipment and items you could take with you.
- » Farseer helm - Gives a great defense bonuses, as well as a magic attack bonus.
- » Cape - Take any cape you like, although a god cape is preferable as it gives a magic boost.
- » Staff - Take the staff that auto-casts the spell you plan on using.
- » Gloves & Boots - Bring along anything that gives attack and defence bonuses.
- » Rings - Bring any ring you like. A ring of life won't serve you too well though.
- » Armour - Dragon armour isn't necessary, Veracs is a good option as well. Rune works just fine as well.
- » Granite shield - Gives higher ranged defence. Alternative: Obsidian shield.
- » Amulet - Amulet of Glory is the best choice, unless you're willing to risk with an Amulet of Fury. Although the Barrows brothers are dead, an amulet of Salve won't work on them.
- » Ectophial - Teleports you to Port Phasmatys.
- » Black D-Hide & Magic shortbow - Necessary against Ahrim's powerful magic attack.
- » Abyssal whip - Use this on all other Barrows Brothers, and while down in their crypt.
- » Dragon dagger - Take this if you can't afford a whip.
- » Spade - This is necessary on all trips as you need to dig over a mound to enter the crypt.
- » Lumbridge teleport - Teleport to Lumbridge to recharge your prayer.
- » Teleport Tablets - Teleport you to any location you choose but only take up one inventory space.
- » Magic dart runes - Magic dart is a powerful spell, and is commonly used here at the Barrows.
- » Food - Lobsters, Sharks, any form of food that heals over 12 in one gulp will work well.
- » Adamant arrows - Take these to kill Ahrim with. Only 50-100 should be more than enough for one trip.
Other optional equipment could include:
- » Potions - Bring along some 4-dose Prayer Restore, Super Attack, or Super Strength potions.
- » Prayer book - A prayer book is good to bring along if you wish to use prayer.
- » Gloves - For better defence bonuses, bring armoured gloves (Barrows Gloves) etc.
- » Ancient Mace - Can be used to increase or regain prayer points.
2.0 - How to get there
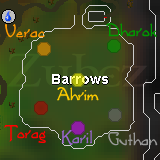
The Barrow Brother's crypts are located to the east of Mort'ton, in Morytania. There are numerous methods you could use to get to the Barrows; this section outlines them.
Method 1: Walking
Requirements:
This method is the more simple of the three, yet takes much more time. Head east of Varrock, until you reach Canifis. Once in Canifis, use the bank to withdraw any supplies you need - don't bring them on the run from Varrock to Canifis, as it'll slow you down - and go behind the pub.
Climb down the trapdoor, and you will find yourself in the pub's basement. Search the wall to find a secret door; squeeze through it and walk to the other side of the tunnel until you reach a door. Go through the door, and you will find yourself at The Hollows. Head south now, and go over the small bridge you repaired during the In Search of the Myreque quest (if any planks appear to be broken, simple click repair and it should fix itself without the need for any tools). 
Continue on south as fast as possible, to prevent losing any food to the Ghasts. Once you reach the river, find the Swamp Boaty and hop in. Take the boat downstream to Mort'ton, cross the bridge, and head east to the Barrows.
Alternatively if you cannot access the pubs shortcut, just go through the swamp, walk all the way south, following the south-west water-edge, until you get to the Nature altar location and continue South-East past what looks like a maze until you reach Mort'ton, cross the bridge, and head east to the Barrows.
Method 2: Ectofuntus Teleport
Requirements:
- Must have completed the Ghosts Ahoy quest.
- Must have a full Ectophial
When you finish a trip at the Barrows and want to go on another one, the best way to get back quickly, is by using your Ectophial to teleport you to Port Phasmatys. Once there, refill the Ectophial at the Ectofuntus, run west to Canifis, and head back through the swamp to the Barrows.
Alternatively, if you have an amulet of Ghostspeak, you can bank in Port Phasmatys (if you need to), and run to the Swamp Boaty without having to go through Canifis. To do this, run towards, then south of the Werewolf Agility Arena, cross the bridge, and continue trekking south until you find the boat. Hop aboard and when you arrive, make your way east to the Barrows.
This method is much faster and safer to use. If you don't know your way around Mort Myre Swamp, then use the shortcut behind Canifis pub to get to the Hollows - otherwise run straight there from Port Phasmatys.
Method 3: Teleporting to Canifis (Kharyrll)
Requirements:
- Level 66 magic
- Two law runes, one blood rune
- Must have completed the Desert Treasure quest.
This method depends on the type of magic you decide to use against the Barrows Brothers as you must have it set to Ancient Magicks, to cast the Kharyrll (Canifis) teleport. This spell transports you to the front of Canifis' pub, where you can bank, and then take the shortcut to the Hollows to get back to Barrows.
Method 4: House teleporting
Requirements:
- Level 50 construction and 40 magic
- Kharyrll teleport in house, 1 law, 1 air, 1 earth
- House with Portal Chamber (with Kharyrll teleport)
This method, is only good, if you have a portal with the Kharyrll teleport. Teleport with the house teleport, use your altar (if you have one), use your portal to teleport to Canifis, bank, repeat.
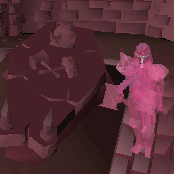
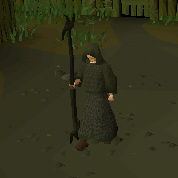
3.0 - The Crypts & Tactics

The Brothers' crypts have remained dormant since the end of the 3rd age, and were only recently discovered during an excavation of the area. An ancient, crumbling tome was found near the area, and can be found in the hut by the entrance to the Barrows for your perusal; it's quite an interesting read. It discusses the Barrow Brother's roles in the God Wars and their eventual split.
Those who dare to fight these ancient spirits had better be prepared, for they show no mercy. Once you've disturbed their resting place, they will battle you full-force. Each brother has their own special ability, which is attributed to their respective armour sets, and will utilise said ability during combat. When you have killed at least one brother, you will be able to enter the maze-like tomb below. Although finding which crypt lets you enter the tomb can be tricky, as it randomizes each trip. Another thing to be aware of, is that when the heads of the brothers appear in your game window, they are draining your prayer. Also, ensure that you turn accept aid to off so people don't teleother you while you're on low health, which may cause you to die.
3.1 - Normal Strategy
| Picture |
About |
 |
Name: Ahrim the Blighted | Level: 98 | Style: Magic | Crypt: Middle
Difficulty: Easy-Medium
Recommended Tactic: Equip your ranged armour and bow prior to entering his crypt. Protect from magic is not necessary if you have a high magic defence. Search his sarcophagus and begin showering him with your arrows. Use the special attack at the beginning and end of the battle.
Notes: Ahrim casts fire wave during his battles. Do not wear any armour that gives a negative magic defence. Dragonhide is extremely effective in stopping his attacks. He is very weak against ranged attacks. |
 |
Name: Dharok the Wretched | Level: 115 | Style: Melee | Crypt: North-east
Difficulty: Hard
Recommended Tactic: Before entering his crypt, equip your staff, and make it auto-cast the spell you will use. Also remove any armour that is giving you a lower magic attack bonus. Use magic dart, a blast spell or a wave spell for best effect. Higher-level ancient magick ice barrage, blitz and rush spells are also effective. Once you're ready with the auto-cast, turn on protect from melee, and search his sarcophagus. It is advisable to defeat Dharok first up, as he often requires the most prayer or food.
Notes: Dharok is exceptionally powerful, hitting upwards of 80 - yet he is a lot less accurate than the other brothers. He is quite weak against magic attacks. Rather than praying, you could cast entangle to hold him for 15 seconds. Also, keep in mind that at times, there will be other players inside the chamber who WILL teleother you when your prayer runs out, enabling Dharok to hit high numbers on you. Be careful, and always turn accept aid off when fighting Dharok. |
 |
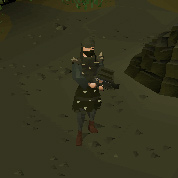
Name: Guthan the Infested | Level: 115 | Style: Melee | Crypt: South-east
Difficulty: Medium-Hard
Recommended Tactic: There are a few options here. You could equip your staff, remove your armour (to boost the spells effectiveness), set your auto-cast spell, turn on protect from melee, and mage him. Or, you could try to melee or mage him with all your gear on, which is a little slower, but nonetheless effective.
Notes: Guthan is weak against magic, has high defence, and low strength, which could make for a long battle if you decide to melee him. Guthan can heal during battle by the amount that he hits on you, so make sure you have protect from melee on to reduce the damage he deals. |
 |
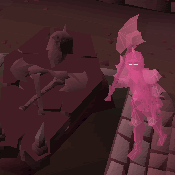
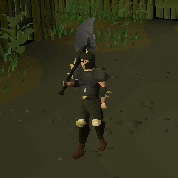
Name: Karil the Tainted | Level: 98 | Style: Ranged | Crypt: South
Difficulty: Medium
Recommended Tactic: Always use the protect from range prayer. Only those with 80+ attack and strength should attempt to melee him. All others will be better off maging him.
Notes: Karil uses a ranged attack, with power similar to that of a magic bow attack with rune arrows. For some illogical reason, Karil has a very high melee defence and a relatively low magic defence. That is why most of the time it is faster and more economical to mage him than to melee him.
|
 |
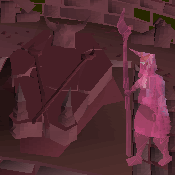
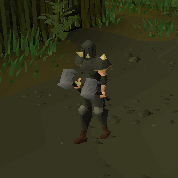
Name: Torag the Corrupted | Level: 115 | Style: Melee | Crypt: South-west
Difficulty: Medium-Hard
Recommended Tactic: As with the other warriors, using magic against Torag is the safest option. Ensure that you have removed any armour that reduces your magic attack before opening the sarcophagus. Also set your auto-cast spell, and turn protect from melee on. Once you're ready, open it up and slay him.
Notes: Torag hits fairly slowly, but with great power. |
 |
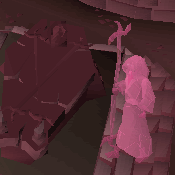
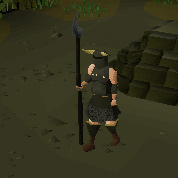
Name: Verac the Defiled | Level: 115 | Style: Melee | Crypt: North-west
Difficulty: Medium
Recommended Tactic: As with the other warrior brothers, set yourself up to mage Verac. Once you're ready, open his sarcophagus and let him have it. It is advisable to defeat Verac early on while you're fresh, as he sometimes requires a lot of food. Note that Verac can hit through protection prayers.
Notes: Verac has high attack and fairly high strength, but low defence. As with Guthan, Dharok and Torag, he is weak against magic attacks. Even though Verac hits through prayer, he hits a lot less often if you pray. His max hit is 15 with prayer and 23 without. Using prayer is advisable as he can hit constant 22s without prayers. |
3.2 - Ancienting at Barrows
Requirements
- Full Mystic or Ahrims
- Runes (mostly Bloods, Deaths, and Waters)
- Completed Desert Treasure
- An Ancient Staff helps
An alternate strategy to defeating the Barrows brothers involves not using prayer restore potions. This method requires Desert Treasure to have been completed, as you need to cast Ancient Magicks. The strategy for fighting the melee brothers is to freeze them on one side of the tomb using ice spells (ice barrage and blitz are best), then run to the other side and attack with other spells. note that blood spells work best, but are more expensive to cast. With Ahrim and Karil, you must continually freeze them using ice barrage or ice blitz, as they can hit you with their magic or ranged from the other side of the tomb.
4.0 - The Tomb & Rewards
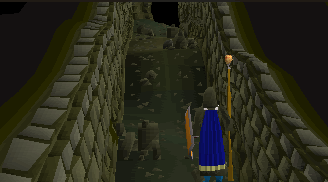
Once you have awoken the brothers, and killed at least one of them, you will be able to enter the tomb - although finding it can be a little tricky. The brothers' crypts always stay in the same place, meaning Guthan is always in the south-east corner, Dharok is always in the north-east corner, etc. However, whether or not the brother is actually in his crypt, is randomized every trip. If you find that a brother is not in his sarcophagus, it means this crypt is the "hidden" entrance to the tomb, and that you will encounter that brother down in the tomb either before you get to the chest, or when you arrive at the chest. So, once you've found the hidden entrance - and are sure you're prepared for the onslaught of skeletons, rats, spiders or leeches - climb down.
The Barrows tomb is located below the brethrens' crypts, and is quite difficult to navigate through. There are nine rooms in total, with four passageways that take you from one side to the other, with the middle room, being the chest room. Adventurer's must be wary while navigating through this maze-like tomb, as arriving at the chest is, unfortunately, no easy feat. This is due to the complete randomisation of open and shut doors, the skeletons, rats, spiders, and leeches, and the certainty of bumping into one of the brothers. On top of that, you may well be low on food, hit points and prayer, which makes it far more dangerous. As with the crypts, when the faces of the brethren appear on the game window, it means they are slowly draining your prayer.
Once you have managed to get to the door leading to the chest room, you will be tested with a simple question. This question is like a SOI (structure of intelligence) question, whereby you must choose the correct image that finishes off a given sequence. The question itself is easy, however, being able to click on the right answer is not! It becomes frustrating when the answers and questions randomize, and when monsters attack you, taking you away from the question screen before you can answer. You have to be very fast to get in! If you get the puzzle wrong, the room will shake, and the entire maze will "reset itself", and you need to start all over finding the chest room.
If you manage to get into the chest room, and haven't already been visited by a brother, then be prepared! He will attack you either when you enter the room, or when you open the chest. You can try to escape him, but watch your hit points level to ensure you don't die. Once you have your reward, you must exit the same way you came in, unless the maze reset itself, in which case you will have to search for the ladder, as the room it's in randomizes as well - you could use your Ectophial or Lumbridge teleport to escape.
The rewards from the chest are great, and unfortunately, completely random. Within the chest, you may find items such as a piece of barrows equipment, coins, mind runes, chaos runes, death runes, blood runes, bolt racks, dragon med helm, or a half key. Many theories surround how you can obtain these rewards, and more importantly, the barrows items. Leading theories on the amount of runes given in the chest state that the more of a certain NPC you kill in the tomb, the higher amount of runes you will receive.
Once you have looted the chest, it is highly recommended you go and restock your supplies by either selling them to the Mort'ton General Store, or if you have completed the In Aid of the Myreque quest, banking in Burgh de Rott. If you have a high defence level, you can take less food, allowing more room for prayer potions. This way, you can do a couple runs off of one inventory.
5.0 - The Brother's Battle Gear
The Barrow Brother's battle gear is some of the strongest equipment in the game, all requiring very high levels to wear or wield. Each set of equipment has its own special ability, which randomly activates during combat; these are shown in the tables below.
The downside to the barrows gear, is that it degrades after a certain amount of time in combat, and cannot be used. Each piece, when fully charged, will last 15 hours in combat - how charged each piece is, is shown by the number following the item's name. For example, when you recharge it, or first obtain a piece of the barrows gear from the chest, it won't have a number. This means that it is fully charged. During combat, the piece will then drop down to 100, then 75, 50, 25 and finally 0. When it reaches 0, even if the armour is equipped, all of its bonuses become "+0" and once the sets are removed, they cannot be worn until repaired. Also, this gear is so exclusive, that it can only be traded when it's in 100% condition, or 0% condition. To repair your barrows pieces is a costly venture; repairing a full set from 0% will cost 330k. Of course, you can fix the pieces before they reach 0%, and it will cost you less, but ultimately it ends up being the same price.
To get your pieces fixed, take them to the following places, and use them with the person mentioned: Bob, Bob's Axes Lumbridge; Tindel Merchant, Port Khazard docks; Dunstan, Burthorpe's anvil, Burthorpe; and the Blacksmith Squire at the Void Knight Outpost. Another option is to create an Armour stand in the workshop of your House, and repair it there. The cost in repairing your armour by yourself depends on your smithing level, and is much less than taking it to an NPC for repair.
Note: All of the Barrows weapons are two-handed; a shield cannot be wielded with them.
| Ahrim the Blighted's Set |
 |
Picture |
Name |
Requirements |
Item Stats |
 |
Ahrim's Hood |
70 Defence and 70 Magic |
Attack |
Stab: +0; Slash: +0; Crush: +0; Magic: +6; Ranged: -2 |
| Defence |
Stab: +15; Slash: +13; Crush: +16; Magic: +6; Ranged: +0 |
| Other |
Strength: +0; Prayer: +0 |
 |
Ahrim's Robetop |
70 Defence and 70 Magic |
Attack |
Stab: +0; Slash: +0; Crush: +0; Magic: +30; Ranged: -10 |
| Defence |
Stab: +52; Slash: +37; Crush: +63; Magic: +30; Ranged: +0 |
| Other |
Strength: +0; Prayer: +0 |
 |
Ahrim's Robeskirt |
70 Defence and 70 Magic |
Attack |
Stab: +0; Slash: +0; Crush: +0; Magic: +22; Ranged: -7 |
| Defence |
Stab: +15; Slash: +13; Crush: +16; Magic: +6; Ranged: +0 |
| Other |
Strength: +0; Prayer: +0 |
 |
Ahrim's Staff |
70 Attack and 70 Magic |
Attack |
Stab: +12; Slash: -1; Crush: +65; Magic: +15; Ranged: +0 |
| Defence |
Stab: +3; Slash: +2; Crush: +5; Magic: +15; Ranged: +0 |
| Other |
Strength: +68; Prayer +0 |
| Full Set Special |
Lowers your opponents strength |
| Guthan the Infested's Set |
 |
Picture |
Name |
Requirements |
Item Stats |
 |
Guthan's Helm |
70 Defence |
Attack |
Stab: +0; Slash: +0; Crush: +0; Magic: -6; Ranged: -2 |
| Defence |
Stab: +55; Slash: +58; Crush: +54; Magic: -1; Ranged: +62 |
| Other |
Strength: +0; Prayer +0 |
 |
Guthan's Platebody |
70 Defence |
Attack |
Stab: +0; Slash: +0; Crush: +0; Magic: -30; Ranged: -10 |
| Defence |
Stab: +122; Slash: +120; Crush: +107; Magic: -6; Ranged: +135 |
| Other |
Strength: +0; Prayer +0 |
 |
Guthan's Chainskirt |
70 Defence |
Attack |
Stab: +0; Slash: +0; Crush: +0; Magic: -14; Ranged: -7 |
| Defence |
Stab: +75; Slash: +72; Crush: +73; Magic: -4; Ranged: +82 |
| Other |
Strength: +0; Prayer +0 |
 |
Guthan's Warspear |
70 Attack |
Attack |
Stab: +75; Slash: +75; Crush: +75; Magic: +0; Ranged: +0 |
| Defence |
Stab: +7; Slash: +7; Crush: +7; Magic: +0; Ranged: +0 |
| Other |
Strength: +75; Prayer +0 |
| Full Set Special |
Heals you by the amount of damage you deal your opponent. |
| Dharok the Wretched's Set |
 |
Picture |
Name |
Requirements |
Item Stats |
 |
Dharok's Helm |
70 Defence |
Attack |
Stab: +0; Slash: +0; Crush: +0; Magic: +0; Ranged: +0 |
| Defence |
Stab: +45; Slash: +48; Crush: +44; Magic: -1; Ranged: +51 |
| Other |
Strength: +0; Prayer: +0 |
 |
Dharok's Platebody |
70 Defence |
Attack |
Stab: +0; Slash: +0; Crush: +0; Magic: +0; Ranged: +0 |
| Defence |
Stab: +122; Slash: +120; Crush: +107; Magic: -6; Ranged: +132 |
| Other |
Strength: +0; Prayer: +0 |
 |
Dharok's Platelegs |
70 Defence |
Attack |
Stab: +0; Slash: +0; Crush: +0; Magic: -21; Ranged: -7 |
| Defence |
Stab: +85; Slash: +82; Crush: +83; Magic: -4; Ranged: +92 |
| Other |
Strength: +0; Prayer: +0 |
 |
Dharok's Greataxe |
70 Attack and 70 Strength |
Attack |
Stab: +0; Slash: +110; Crush: +95; Magic: +0; Ranged: +0 |
| Defence |
Stab: +0; Slash: +0; Crush: +0; Magic: +0; Ranged: +0 |
| Other |
Strength: +105; Prayer: +0 |
| Full Set Special |
The lower your hit points, the higher you'll hit (very high hits). |
| Karil the Tainted's Set |
 |
Picture |
Name |
Requirements |
Item Stats |
 |
Karil's Coif |
70 Defence and 70 Ranged |
Attack |
Stab: +0; Slash: +0; Crush: +0; Magic:-1; Ranged: +3 |
| Defence |
Stab: +6; Slash: +9; Crush: +12; Magic: +6; Ranged: + 10 |
| Other |
Strength: +0; Prayer: +0 |
 |
Karil's Leathertop |
70 Defence and 70 Ranged |
Attack |
Stab: +0; Slash: +0; Crush: +0; Magic: -15; Ranged: +30 |
| Defence |
Stab: +47; Slash: +42; Crush: +50; Magic: +65; Ranged: +57 |
| Other |
Strength +0; Prayer: +0 |
 |
Karil's Leather Skirt |
70 Defence and 70 Ranged |
Attack |
Stab: +0; Slash: +0; Crush: +0; Magic: -10; Ranged: +17 |
| Defence |
Stab: +26; Slash: +20; Crush: +28; Magic: +35; Ranged: +33 |
| Other |
Strength: +0; Prayer: +0 |
 |
Karil's Crossbow |
70 Ranged |
Attack |
Stab: +0; Slash: +0; Crush: +0; Magic: +0; Ranged: +84 |
| Defence |
Stab: +0; Slash: +0; Crush: +0; Magic: +0; Ranged: +0 |
| Other |
Strength: +0; Prayer +0 |
| Full Set Special |
Reduces your opponents agility level. |
| Torag the Corrupted's Set |
 |
Picture |
Name |
Requirements |
Item Stats |
 |
Torag's Helm |
70 Defence |
Attack |
Stab: +0; Slash: +0; Crush: +0; Magic: -6; Ranged: -2 |
| Defence |
Stab: +55; Slash: +58; Crush: +54; Magic: -1; Ranged: +62 |
| Other |
Strength: +0; Prayer: +0 |
 |
Torag's Platebody |
70 Defence |
Attack |
Stab: +0; Slash: +0; Crush: +0; Magic: -30; Ranged: -10 |
| Defence |
Stab: +122; Slash: +120; Crush: +107; Magic: -6; Ranged: +132 |
| Other |
Strength: +0; Prayer: +0 |
 |
Torag's Platelegs |
70 Defence |
Attack |
Stab: +0; Slash: +0; Crush: +0; Magic: -21; Ranged: -7 |
| Defence |
Stab: +85; Slash: +82; Crush: +83; Magic: -4; Ranged: +92 |
| Other |
Strength: +0; Prayer: +0 |
 |
Torag's Hammer |
70 attack and strength |
Attack |
Stab: -4; Slash: -4; Crush: +85; Magic: -4; Ranged: +0 |
| Defence |
Stab: +0; Slash: +0; Crush: +0; Magic: +0; Ranged: +0 |
| Other |
Strength: +72; Prayer +0 |
| Full Set Special |
Drains your opponents energy. |
| Verac the Defiled's Set |
 |
Picture |
Name |
Requirements |
Item Stats |
 |
Verac's Helm |
70 Defence |
Attack |
Stab: +0; Slash: +0; Crush: +0; Magic: -6; Ranged: -2 |
| Defence |
Stab: +55; Slash: +58; Crush: +52; Magic: +0; Ranged: +56 |
| Other |
Strength: +0; Prayer: +3 |
 |
Verac's Brassard |
70 Defence |
Attack |
Stab: +0; Slash: +0; Crush: +0; Magic: -6; Ranged: -2 |
| Defence |
Stab: +81; Slash: +95; Crush: +85; Magic: +0; Ranged: +81 |
| Other |
Strength: +0; Prayer: +5 |
 |
Verac's Plateskirt |
70 Defence |
Attack |
Stab: +0; Slash: +0; Crush: +0; Magic: -21; Ranged: -7 |
| Defence |
Stab: +85; Slash: +82; Crush: +83; Magic: +0; Ranged: +84 |
| Other |
Strength: +0; Prayer: +4 |
 |
Verac's Flail |
70 Attack |
Attack |
Stab: +68; Slash: -2; Crush: +82; Magic: +0; Ranged: +0 |
| Defence |
Stab: +0; Slash: +0; Crush: +0; Magic: +0; Ranged: +0 |
| Other |
Strength: +72; Prayer +6 |
| Full Set Special |
The attack may ignore your opponents prayer and armour bonuses. |
|


 OSRS RuneScape Help
 RuneScape Community Forums
 Skill Guides
 Quest Guides
 City Guides
 Guild Guides
 Mini Game Guides
 Treasure Trail Help
 Miscellaneous Guides
 Dungeon Maps
 Mining Maps
 Items Database
 Monsters Database
 Shops Database
 Tome/Books Database
 Skill Calculators
 Coordinate Locator
 Zchat Clan Chat
 Stuck on something? Want some more tips? Ask on our forums.

